Esky 150 V2 Review
A Great RTF Micro Heli For Beginners
by John Salt - Updated December 2023
The Esky 150V2 has been touted by many to be every bit as stable as a micro coaxial and perfect for Beginners new to the hobby.
Question I had... "Is it really?"
After flying it around for a week, both inside and out, here are my thoughts...
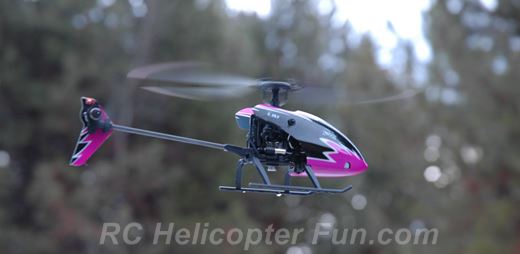
 Esky's Ready To Fly 150 V2 Micro FP Heli
DECEMBER 2022 UPDATE.
The 150 V2 was just discontinued. My newest top pick when it comes to a good beginner fixed pitch micro heli is the C129 / Heli 101.
Back to the review...
First off, this is the same helicopter more or less as the Blade 70S. I've already done a review on it, which covers all the basics of what you get with the RTF package, the cool design, the robustness, etc.
If you have the Esky F150 V2 micro scale Bell 222/Airwolf, this review page on the pod & boom 150V2 version goes over all the mechanics & electronics if you don't know much about them, along with battery & charging options.
Below is an unboxing video and overview with a flight test I did. After the video, we'll dive deeper into this awesome single rotor fixed pitch micro, and go over items I didn't cover in the video or the 70S review.
Esky 150 V2 Design Features
As we just saw in the video, the Esky 150 V2 offers a great design that is both light weight and strong. The protected swashplate location within the frame is nothing short of brilliant; but it's harder to access for repair should the need arise. I've had a few pretty hard crashes however with the 150, and everything is holding up very well, so hopefully you'll rarely need to go messing about inside the bird.

Look closely at the wiring in that above swashplate photo. This is the only micro heli I've ever owned that has wire clips built right into the frame to keep the wiring secure. Smart details that have function!
 Skookum Tail Fin
The tail boom is likely going to be the weakest link and you may want to order a spare boom assembly (#ESKY007323) as I anticipate the hollow carbon square tube easily splitting (thin CA glue may fix it once or twice).
The primary reason for this is the tail fin is so skookum!
It's made from fiberglass and is very stiff. I've never seen such a strong and stiff stock micro heli tail fin.
Very little impact energy will be absorbed by it, and thus, directly transmitted to the boom. Sideways fin impacts will twist the boom torsionally and voila - splitsville. Common with all micro helis that utilize carbon booms, but I predict this one will be a little worse. Ah, the price of having those awesome tail lights :-)
The plus with this strong fin is the motor is well protected along with the tail rotor blade itself. Naturally I have to make mention again on the red SMD LED's on either side of the tail fin. This was the neatest surprise on the heli I was totally unaware of, thinking it was the same as the Blade 70S which doesn't have lights on the tail fin.
The 150 V2's tail fin LEDs are wired in parallel with the motor, so they only come on while the tail motor is spinning (ie. as soon as you spool up). The LEDs are also a steady brightness and only dim down when the tail motor is about to stop spinning.
You can see the little LEDs in daylight, but at night it adds a whole new dimension of fun!
Checking Blade Tracking
The Esky 150 V2 comes with yellow and red tip colored blades. This not only looks kinda cool, it also allows you to easily check the blade tracking.
As seen in the above photo, both the yellow and red blades are more or less overlapping perfectly while I'm hovering the Esky 150 V2.
The yellow is tracking just a smidgen higher than the red. It's more visible on the rear half of the rotor disc than the front in that photo, but it's even more evident with the naked eye. Certainly good enough for a micro fixed pitch machine and very much vibration free.
There is really no precise way to adjust blade tracking on a fixed pitch micro. Heating and twisting the blade is about the only method I know of that works. You however should never have to on this heli because the blades and grips are decent quality.
 Belly Shot!
Under the little bird we can see the pinon and main gear.
The main reason I wanted to include this photo was to point out the two small Phillips screws on the gear hub that hold it tight to the metal rotor shaft. Yes metal. No more split carbon rotor shafts! The upper head as shown before encases the metal shaft, so it's also much harder to bend.
In other words, we get the robustness of a carbon shaft when it comes to bend resistance above the top bearing, while maintaining a split free metal shaft. The main shaft is bearing raced, utilizing an upper 5x8x2mm bearing, and lower 3x6x2mm bearing in the frame.
All screws as you can see throughout this little 150 V2 have Phillips heads and most are small. A small jewelers screwdriver set comes in handy.
 Blade Grip Linkage Screws Came Loose
While on the topic of screws, the two blade grip linkage screws on my 150 came loose and were slowly backing out of the grip pivot shafts after a dozen flights.
You may want to keep an eye on yours at first as well.
If they fly off during a flight, chances are you'll never find them again - very tiny!
I ended up putting a tiny amount of low strength Loctite (the purple stuff) on those two little linkage screws and they have not loosened up since. You have to be very careful if you want to try that since it's easy for the Loctite to wick around the linkage pivot shaft if you get too much on the screw, which will cause it to seize up. I would recommend only doing this if you notice those little linkage screws always coming loose on you.
I bet you also noticed those four teeny screw heads on the bottom of the control unit case. Yep, I did too. Let's get our smallest Phillips screwdriver out!
 Esky 150 V2 CC3D Control Board Internals
Sorry - but I had to take a peek inside.
Electronic guts tell you so much about the overall quality, and this board has plenty of it. It's dual layer with a nice layout and when looking at it under the scope, all SMD components are well aligned and nicely soldered to their pads. For the component junkies out there, the brain on this board is a STM 32F (32-bit ARM Cortex processor). Decent!
The plastic case that protects this dual layer gem is nice and strong, so I can't see anyone ever destroying the board unless you try to use your little Esky 150 V2 heli as a submarine or light it on fire for kicks & giggles.
 Esky 150 V2 Exploded Parts View
The Included Esky Radio / Transmitter
If you've watched the video at the top of this page, you likely picked up that I referenced the included Esky RC radio as a toy type radio. It's light, and limited in what it can do. Well, the exterior is certainly that, but it works well for the target market and keeps the total cost of the ready to fly package low.
Inside however, the toy's exterior is filled by some fairly decent guts!
 Esky 2.4 GHz Radio Internals
Once again, electronic layout is good as is soldering quality. It was nice to see all wires using connectors instead of being hard wired to the board which is firmly screwed to the case. On such a low cost radio, you normally don't get that quality or see wire adhesive on the gimbals and a sleeved dipole RC antenna with a uFL connector.
The RF board (circled in green), was another surprise similar to other higher end 2.4 GHz RF boards on the market. It has an extra uFL output, perhaps for dual diversity when used in higher end radio applications? The RF chip is an off the shelf N51822 for anyone who's interested.
This RF board utilizes GWY's AHSS 2.4 GHz spread spectrum protocol. I don't know a thing about this protocol, but it would appear it's not compatible with anything else out there and is used exclusively by E-Sky. Please contact me, and let me know if I'm mistaken on that point.
 Running NiMh AA's Without Issue
A couple little things to point out on the back of the radio.
There is a micro USB port labeled "DATA Port", but as far as I can tell, it's nothing we the end consumer has access to.
Likely for factory programming, but it would be nice to know if in fact we could access some functions within the radio to alter the feel; especially the amount of dead band around mid stick for cyclic and tail rotor (more on that shortly).
The other thing of note is there are two rubber plugs on the back of this radio, but they have no purpose. There is nothing behind them to adjust within the radio such as gimbal resistance or spring tension.
If you're curious about using lower voltage rechargeable AA's in this radio instead of disposable alkalines', and want to know if they'll work; yes they seem to work fine. I'm using rechargeable NiMh AA's in mine and no issues whatsoever. I've left the radio turned on for a couple hours as well by mistake (easy to do), and the batteries had not drained down much, so the electronics are efficient.
Esky 150 V2 Radio Feel
Despite being such a low cost radio, the stick feel is pretty decent. There is no stick slop but they do feel a little mushy or perhaps "rubbery" is a better term, lacking the precision of true hobby grade computerized radios.
I would like the ability to adjust the throttle stick resistance as it's way too loose for my liking.
There is also a fair amount of dead band around center stick for cyclic and tail. Meaning the heli doesn't respond with small stick commands. For a beginner, this is fine so I understand the reasoning (assuming it's intentional and programmed into the radio). It could also be the potentiometers inside simply have lots of mechanical dead band; but looking at them, they are good pots so I can't see that being the issue.
The digital trims are solid and they beep with each notch of trim you add to let you know you are in fact adding trim. The center point is indicated with a long beep. They have good resolution with about 25 points of trim on either side of center.
Speaking of trims, there is one problem you may encounter if you ever have to bind your Esky 150 V2 to the radio. The procedure as I demonstrated in the video has you hold in right rudder trim while powering on the radio. Afterward, you may find your heli yaws (turns) right if you didn't let go of the trim right after the bind took.
To me, it would have made much more intuitive sense for Esky to program the firmware so the dual rate button on the top corner of the radio was used in the bind procedure instead of the rudder trim. Maybe that's just not possible?
And speaking of that dual rate button; as I mentioned at the end of the video, I would like to have seen a little toggle there instead of a button for a visual indicator of when you have dual rates turned on and off. An indicator light (in my case idiot light), would also work. Maybe just utilize the blue power on indicator light and have it flash fast or change color when the dual rates are off or on...
Just tossing some constructive thoughts out there Esky.
Esky 150 V2 LiPo Battery Stuff
 Charging a depleted 1S 150 mAh LiPo with the included USB charger takes about 35 minutes.
As we saw in the video, the one battery that comes the 150 V2 is a very common size 1S (single cell), 150 mAh Lithium Polymer (LiPo) battery.
If you fly micro RC aircraft of any sort, you're likely very familiar with this size.
They are inexpensive so getting several for back to back flights is not going to break the bank and be well worth it to maximize your fun factor.
The majority of single cell 150 to 200 mAh LiPo micro packs on the market have a hard plastic end cap, with a 2 pin Picoblade plug built into the cap.
The 150's are different in that they have a short pig-tail wire with the 2 pin Picoblade plug on the end of the wires. The wiring is nice and soft, high flex silicone wire, and there is silicone/similar material applied to the end of the Picoblade plug where the wires enter for strain relief purposes. The wiring is protected and insulated on the battery end by Kapton tape. It's easy to manipulate the wire/plug for connecting and disconnecting from the heli.
At any rate, finding 1S 150 mAh packs with those wired Picoblade plugs is not easy. There are just not that many out there, with the built in cap ones being vastly more popular.
That said, you can find them if you use your Google Fu.
You could also go slightly higher in capacity to extend flight time slightly, provided they still fit and don't weigh much more. Sorry, I can't offer up pack weight since my digital scale took a dump and I haven't replaced/fixed it. My guess is a 200 mAh 1S pack is about the heaviest/largest you could go. 180mAh seems to be a popular capacity.
If you enjoy DIY and building your own little LiPo packs, you could easily do that as well. Many sources sell small single cell LiPo's for dirt cheap.
If you want some sizing ideas, here are the dimensions (rounded to the nearest millimeter) of the stock LiPo battery that comes in the RTF 150 V2 package.
 Length = 42mm, Width = 13mm, Thickness = 5mm
The length and thickness dimensions can't be too much larger than what's listed here as fit along those dimensions is snug. The width dimension however can be wider by about 4-5mm as there is a little wiggle room on the right side of the battery tray.
 240 mAh cell just a little too wide to fit in the Esky 150 V2
You would have to have the wider battery sitting off-center to the right however so you could still access the power plug on the left side.
I made this larger capacity LiPo micro LiPo pack (using a 240 mAh LiPo cell), and it's just a little too wide (19mm), and a little too heavy.
That is why I recommended not going over 200 mAh.
Basically, the canopy hugs pretty tight around the size and shape of the case/battery tray, so as long as the battery doesn't overhang the case corners, and is no thicker than about 5-6mm, it should fit.
150 V2 Multiple LiPo Pack Charging Options
The USB charger that comes with the 150 works well, but you are of course limited to charging a single battery at a time.

I've been charging my 150 V2 LiPo packs primarily with the E-flite Celectra 4-Port charger.
I love this little charger for all my single cell micro packs that have the 2 pin Picoblade plugs. It will charge up to 4 packs at a time.
The one issue however is it's meant for the micro packs with the Picoblade end caps.
It's hard to get the little wired end Picoblade plugs into the sockets.
Tweezers are a must.
Thing is, it's safe, and I already had it so didn't have to spend a dime.
 Picoblade parallel charging harness
Another "multi pack" charging option is of course to use a Picoblade Parallel Charging harness.
This requires more care, understanding, and a suitable computerized RC charger that can handle small capacity packs like this and won't overcharge them.
Not many (if any) beginners are going to charge this way, and I likely shouldn't even be showing this method as it's advanced and can be dangerous if you don't know exactly what you're doing.

However, if you know about parallel charging already, and have a computerized charger that allows micro pack charging (can output small enough current and detect fully charged micro packs), this method works well.
You can also use these micro plug parallel charging boards.
I personally like these little micro plug paraboards over the parallel harness type as I find them the easiest to connect and disconnect from the packs; plus they are nice and compact.
Storage Of Your Esky 150 mAh Micro Packs
If you've already "absorbed" the information on my LiPo battery page, you know how important it is to keep LiPo's stored at approximately 50% capacity (3.85V per cell); at least if you want to get good life out of your packs.
These little micro packs are every bit as susceptible to fast degradation when stored fully charged or nearly depleted. I don't know how many micro packs I've ruined over the years because I failed to just take a little time to ensure they are sitting at about a 50% charged state before they sit for days, weeks, months, or even years.
Computerized chargers allow you to "storage charge" your LiPo's but with little micro packs like these and the simple chargers they come with, we don't have that option.
My storage method for all my micro heli's LiPo's is simple and fun if you want to try it. I just fully charge the packs and then hover the little heli around with each pack for about half the normal flight time to drain the pack down to about 50%. In the case of the Esky 150 V2, that means about a 2 minute hover/flight.
How Does The ESky 150 V2 Fly & Is It Truly As Stable As A Coaxial?
 The Esky 150 V2 Is "Almost" As Stable As A Coaxial
Let's start with the stability.
Yes, this little fixed pitch micro is almost as stable as a micro coaxial thanks to the CC3D flyarbless stabilization system that utilizes 6 sensor technology (3 axis gyro, 3 axis accelerometer).
It pretty much hovers hands off as shown in the video.
What's different however over a coaxial is the ESky 150 V2 moves faster and is more reactive. When leveled out, it also continues to drift for a little while longer before slowly coming to a stop requiring you to give a counter cyclic correction to stop it on a dime (that builds important collective pitch flying skills).

Coaxials on the other hand more or less stop moving the moment you center your cyclic stick; partly because they don't have as much movement inertia, and partly because those two counter rotating rotors have way more drag and act as an "air anchor".
A total beginner will therefore find a coaxial somewhat easier at first, but they won't learn the same important "counter correction" cyclic skills that the 150 will teach them. They will also more than likely get bored with a coaxial quicker. In other words, if your main goal is to eventually get into collective pitch, the ESky 150 V2 in my opinion will be a much a better micro to start on, learn on, and progress on.
It may be a little more frustrating for the first few battery packs/flights, but after a little practice and getting the hang of the controls, you'll be glad you have that extra performance and more accurate RC helicopter response and behavior.
The only other draw back of the 150 is the shorter flight time. 4:30 minutes is about the average I was getting. You can push it to 5:00 minutes, but that is over-discharging the LiPo and shorting the life substantially. A similar sized micro coaxial with the same 150 mAh 1S Lipo will get around 8 minutes of flying time because they simply have more lift efficiency.
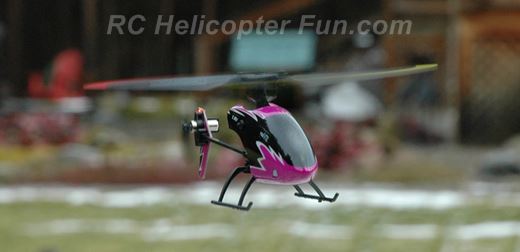 Not a huge fan of the color, but this little heli still looks good while flying.
The Esky 150 V2 is responsive and fairly predictable. Like all micro fixed pitch RC helicopters with coreless motorized tails, when power is reduced quickly (after getting lofted by a gust of wind for example), the tail will blow out. This is much more likely to happen outside because of those little puffs of wind and air currents. Indoors, if you fly it normally, tail lock is very good.
Jamming 100% on the power, the tail hold is surprisingly good and only a small amount of blowout occurs sometimes. This is likely due to the fact the throttle response is quite docile with some delay built in. You really notice this if you jam full power on and then reduce it. It takes a good second for the power to start ramping down. Good for a beginner!
Also like all fixed pitch micro RC helicopters, this little rascal doesn't like wind whatsoever. Just the limitations of high lift fixed pitch rotors and low rotor RPMs; doesn't matter how good the stabilization system is. In short, don't expect collective pitch wind handling performance or smoothness.
To get an idea of how sensitive to wind, and even air currents the 150 V2 is; while taking photos of it close up for this review, if I walked backwards away from the heli, it would immediately be drawn into the low pressure area my body was creating as I backed up; and it actually would follow me provided I kept my pace moderate and steady. An unwanted "follow me" mode ;-)
Again, nothing new or unusual for this type of RC helicopter and it really is best suited for indoor flying, or dead calm conditions outdoors when you are first learning to fly it. Once mastered however and turning the dual rates off for maximum cyclic authority, a light breeze is doable, but not that enjoyable.
 The 150 V2 Suffers From "Ballooning" When Flying Fast
Another common micro FP heli flight characteristic that the Esky 150 V2 can't escape is ballooning. Once you gain enough forward (or backward) speed, or are flying into a slight breeze, the nose of the helicopter pitches up and the helicopter slows right down.
This is caused by something known as "dissymmetry of lift". I won't get deep into the physics here, but the short of it is when any helicopter is flying fast in any direction, more lift is generated by the advancing rotor blade in the direction of flight, and less by the retreating blade. If you want to understand this phenomenon better, I cover it in more detail on my RC Helicopters Controls page under the heading "Dissymmetry of Lift & the Helicopter Speed Limit".
At any rate, the slow rotor RPM in conjunction with the high lift rotors, on all FP micros including the 150 V2, enable dissymmetry of lift to occur at much lower flying speeds than a collective pitch micro, and that's what causes the ballooning.
If you keep holding full forward cyclic while this ballooning occurs; the 150 V2 will enter into this nice rhythmic up and down oscillation usually called "porpoising." Sorry to put you to sleep there, but just thought you might like to understand why your Esky 150 has that behavior. There is nothing you are doing wrong and nothing you can do to prevent it other than flying slower. There is nothing wrong with the helicopter either other than the inherent limitations of fixed pitch micros.
Other than that, the Esky 150 V2 offers up a very enjoyable flying experience that will help you gain important skills needed to progress into collective pitch. It's also just plain fun to fly!
Final Thoughts
There really isn't much to add here that I haven't already said in the wrap-up of the video I did.
The Esky 150 V2 is simply a great little micro FP RC helicopter in my opinion, for beginners who eventually want to take up collective pitch. The skills you learn on it will allow you to progress into CP well prepared.
It's strong, well designed, works & flies well, inexpensive, parts are also inexpensive and easy to get. On the parts note, the other thing to consider is since it's the same heli as the Blade 70S, all the parts from it will also fit your 150 V2 (or the other way around). Blade is carried at most good hobby shops, so you could likely get any part for your 150 V2 down at the the local hobby shop. That adds even more value.
For the low cost of around $80 USD for a ready to fly package, it's hard to go wrong. Most "lesser" flybared RTF hobby grade micro coaxials cost more!
 Esky 150 V2 RTF Package
Esky 150 V2 RTF Specifications
- Skill Level: Beginner
- Heli Type: RTF Electric Micro, Single Rotor, Fixed Pitch
- Standardized Size Class: 70
- Stabilization System: CC3D Electronic 6 sensor (3 gyro, 3 accelerometer)
- Battery: 1S 150 mAh LiPo
- Flying Weight: 34g
- Height: 62 mm
- Width: 44 mm
- Length: 180 mm
- Main Motor Type: Brushed Coreless
- Main Rotor Blade Length bolt hole to tip (70mm)
- Main Rotor Diameter: 180mm
- Main Rotor Head Type: Fixed Pitch Flybarless
- Cyclic Servos: 2 Linear (cyclic pitch & roll)
- Tail Drive: Fixed Pitch, Direct Drive
- Tail Motor Type: Brushed Coreless
- Tail Rotor Diameter: 36mm
- 2.4 GHz Protocol: E Sky V2 AHSS
- Available in Mode 1 or Mode 2
 Definitely A Fun Little Bird!

Need Heli Help?
- Getting into the hobby but have no one to help you?
- Are you feeling overwhelmed & confused?
- Are you tired of wasting time seeking partial and conflicting information?
- Don't understand the maze of RC heli setup fundamentals?
- Is that sickening feeling after crashing turning you off the hobby?
- Are you simply ready to give up?
My RC Helicopter eBooks will help you with those exact problems. Grab your copies today.

Click Here For More Information

Click Here For More Information

Click Here For More Information
Recent Articles
-
The Ultimate RC Helicopter Tools Guide: What You Need & Why
Apr 10, 26 12:56 PM
 A complete breakdown of RC helicopter tools. Let's cover swashplate levelers, pitch gauges, hex drivers and much more to help you achieve a pro-level build.
 -
Best RC Battery Charger Guide: How to Choose the Right One
Apr 07, 26 02:29 PM
 Confused by Amps and Watts? Learn how to choose the best RC battery charger with this guide covering features, power, ratings, safety and much more.
 -
RC Power Supply Guide: Don't Starve Your RC Charger
Mar 31, 26 06:33 PM
 From low cost converted server power supplies to commercial grade options, let's find the best RC power supply for your specific RC battery charger.