Understanding Flybarless RC Helicopters:
by John Salt - Last Updated February 2026
 Flybarless Rotor Head
- What is a flybarless system / flight controller?
- How do they work?
- How do they feel?
- What are the benefits?
- Are they easier to fly?
- How do you hook them up?
- Are they good for a beginner?
- Which is best?
All great questions!
Flying with a flybarless head also called an FBL rotor head on RC helicopters is nothing new for the larger scale crowd as many big scale RC helicopters, especially those with multi-bladed rotor heads have been around for years.
They were sensitive and difficult to control, not to mention the ballooning issues in fast forward flight (where the bird would pitch up if you didn’t hold in forward cyclic). It was a constant workload that took much of the joy out of flying.
 Flybar Rotor Head
Most average people in the hobby (sport, general, semi scale, 3D, and certainly beginners) would have never even considered flying an RC helicopter without mechanical flybar stabilization.
Well, those days are long gone thanks once again to the huge improvements in electronic miniaturization and gyro / accelerometer technology.
Going flybarless is now a reality and has some wonderful benefits over the trusty old flybar for all types of RC helicopter flying.
With costs coming down all the time and the systems getting easier to configure and setup, FBL systems are now immensely popular. RC helicopter manufacturers have stopped producing flybared helicopters altogether.
Even the entry level/low cost micro segment are embracing this technology with all their single rotor micro sized helicopters now sporting electronic flybarless stabilization.
What Does A Flybarless System Consist Of?
 Bavarian Demon Axon Flybarless System With Built In Sensors
Most electronic flybar systems consist of the gyro sensors and the mixing/control unit/servo Bus (what your servo's plug into). Note, most FBL controllers don't have built in receivers - more on that in a bit.
These can be combined in one unit as shown here with the Bavarian Demon's Axon electronic flybar system; or they can have the FBL sensor separated (remote) like on Mikado's VBAR NEO system.
 Mikado VBAR FBL Unit With Remote Sensor
Combined systems generally give neater and easier installs, whereas systems with "remote FBL sensors" give you the flexibility to mount the sensor in various areas on-board the helicopter.
That said, flybarless systems with remote sensor units have pretty much been phased out.
Today's FBL controllers have much better vibration immune sensors in combination with better and faster processors, vibration ignoring/filtering algorithms, and internal sensor orientation selection (ie. you can mount the unit in any orientation on the aircraft).
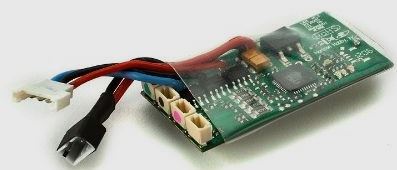 Micro Heli Flybarless Combination Control Board
All micro sized helicopters with electronic stabilization will generally have a combination control unit that incorporates the receiver, ESC, BEC, and the flybarless stabilization gyros as shown here with the "combination" control board from a micro collective pitch helicopter.
The other part of a FBL system is naturally the head itself.
There are various designs of collective pitch FBL rotor heads but the 3 main types I have listed below (I'm just showing two bladed heads, not multi since I have limited experience with multi and am all for keeping it that way). The main thing to note on all examples however is there is no flybar.

First up is the non integrated washout type.
This design uses a washout (also know as a swash driver or swash
follower) that is a stand alone unit (circled in green). It is clamped
onto the mast to transmit rotational forces to the upper half of the
swashplate to keep it correctly phased with the rotor head.

Next is the integrated washout type FBL head.
This design eliminates the washout/driver/follower base and places the washout arms directly on the lower part of the head block (circled in green).
The three advantages with this design over the separate washout is setup/head build is easier since you don't have to mess with washout height setting or angle phase.
Parts count is down slightly and the mast can usually be shortened a bit to bring the rotor disc down closer to the helicopter's center of mass.
In my opinion, from a purely mechanical workings point of view, this is the overall best design of all three; but that is just my 2 cents.

Last up is the DFC or Driverless head.
No green circle in this photo because the washout (swash driver) has been eliminated. I have an entire write-up on DFC / Driverless and encourage you to click on that link to read about DFC if you don't fully understand how it works and some issues to be aware of with it.
Best Flybarless System?
Click above link to be taken to my "Best Flybarless System page".
How Do Flybarless Systems Work?
First off to understand how a FLB system works you need to know how and what a flybar does.
My page here on flybars and head types covers that in detail, but a very simple explanation of flybar function is to add stabilization to the rotor disc by automatically changing the cyclic pitch angles of the rotor blades to help improve cyclic stability and make cyclic control much more manageable.
As the name suggests, flybarless (FBL) does away with the flybar and with the help of electronic stabilization systems, "virtually" replaces the flybar (why they are also called “virtual” or "electronic flybars").
Once again we owe this to the scale boys and girls since they were really the ones to first experiment with electronic stabilization systems on their no flybar birds. I remember reading several articles a couple decades back when solid state heading lock gyros were first coming on the market – the Futaba GY240 to be exact.
More and more scale fliers using scale flybarless heads were now putting not only a tail gyro in their birds to detect and correct for unwanted yaw movement; but they were also installing two more gyros mounted vertically to pick up the pitching and rolling movement of the heli (the head gyros).
The aileron (cyclic roll) servo was plugged into the gyro that detected roll, and the elevator servo (cyclic pitch) was plugged into gyro that detected pitch. Now when the heli would pitch forward for example the gyro that detected pitching movement would detect that movement and then send a command to the elevator (cyclic pitch) servo to have it tilt the swash backwards to automatically bring the bird back into level flight.
 3-Axis Flybarless System Sensors
This is the basic principle of how all electronic flybars operate.
As seen in the picture to the right of an early style flybarless sensor that has the 3 solid state gyros oriented within the sensor just as if 3 separate tail gyros were used to detect yaw (tail), pitch, & roll (head).
The same cyclic pitch changes that the mechanical flybar would
impart to the main rotor blades are now done by the two head gyro sensors that detect the pitch and roll attitude of the
heli and then move the servos to tilt the swash to make the precise and
quick cyclic changes.
You can see this with any FBL setup that uses an electronic stabilization system and it is actually how you test to confirm the system is working properly. If you are holding the bird and tilt it forward, you will see the swashplate tilt backwards. If you tilt the bird left, the swash will tilt right.
PID Control Algorithms
Flybarless flight control systems all use something called a PID control loop algorithm. This stands for "Proportional" "Integral" & "Derivative". PID electronic control systems are all around us these days from heating systems to helicopters. Their purpose is to constantly measure for any error state off nominal and then send a correction command to correct for it.
I think you can appreciate how such a control algorithm can also be used to detect and correct for unwanted RC helicopter movement; just like a mechanical flybar; only with much more precision, speed and tunability.
This topic is covered in much more detail on the PID control loop page; but I at least wanted to mention PID here because it's the fundamental backbone of how all FBL systems function.
How To Connect A Flybarless Flight Controller To Your Receiver?
This is such a common question for those new to flybarless or just starting out in the hobby. Just like a standard tail gyro, most stand-alone flybarless control systems (ie. not the integrated ones used in micro-helicopters), have to be connected to a receiver (RX) on the helicopter to receive your movement commands from the radio (transmitter - TX).
The servos that control your helicopter (pitch, yaw, roll, collective) are then connected to the FBL system so it can move those servos as required to both stabilize the helicopter and impart your desired movement commands.
The FBL unit is basically placed in "series" between the receiver and the servos.
There are 3 primary ways this is accomplished:
- Standard RX Connectivity Method (PWM - pulse width modulation)
- Remote/Satellite RX Connectivity Method (PPM - pulse position modulation)
- SRXL (serial protocol communication)
 1. Standard RX FBL Connectivity Wiring
Pictured above is a typical standard RX wiring connection. This is the most basic FBL connectivity method and is support by most flybarless units; but it's likely going to be phased out is my guess. A multi conductor wire harness consisting of at minimum 7 wires (your 5 control channels plus +/- power) is used to connect all the RX's output channels to the FBL's input channels as well as feed power back to the RX.
 FBL System 10 Conductor Standard PWM Wiring Harness
The RX communicates with the FBL unit through this multi conductor wiring harness using the same standard PWM (pulse width modulation) signal that it uses to communicate with servos (PWM is covered in detail on my servo page).
Each individual control channel output from the RX is connected to the FBL input for that same control function.
An example would be Aileron-out on the RX to Aileron-in on the FBL unit and so on for elevator, rudder, collective, gain, and perhaps throttle.
The advantage with the standard FBL connectivity method is most FBL units support PWM connectivity it as do normal RC receivers so there is rarely any compatibility issues between any brand of RX or FBL system.
The main drawback is it's bulky requiring a full function larger RX along with a mass of wiring. Not the best option for smaller helicopters (450's and smaller), and impossible on micro sizes like the T-Rex 150X or OMPHobby M2.
 2. Satellite/Remote RX Connectivity Wiring
Using a small satellite (remote) receiver as shown above, is a very popular and convenient method used by many people who fly with Spektrum radio systems using DSM2/DSMX protocol.
One or two small satellite/remote receivers are used and plugged into the FBL system to transmit the commands from the radio by way of a small 3 wire conductor harness. One wire transmits the PPM (pulse position modulation) signals from the RX to the FBL unit, while the other two are used to power the satellite RX.
Almost all flybarless systems on the market support Spektrum & JR satellite RX connectivity these days. The advantage is it's a very simple and elegant connection method, with very little weight or bulk.
The downside can be if you need more channels (such as in scale), you don't have them since most FBL units don't have more than one or two extra channel outputs (if any). There is also the problem if you have an FBL system that has telemetry or some sort of forward programming (programming the FBL system from your radio). For those options to work, you need two way communication between the receiver & FBL system.
 3. Serial RX FBL Connectivity Wiring
Last up we have a serial communication connection which like the Satellite RX connectivity method uses a simple 3 or 4 conductor wire harness to communicate with the FBL controller, but it uses a serial communication bus/network.
The big advantage here is much more data can be transferred and can also be sent in both directions. This is getting to be the primary method many higher end FBL systems and serious pilots are utilizing since it's compact, light, elegant and powerful.
Popular RC radio system serial protocols that most good FBL systems support include: Align/FlySky iBus / Futaba SBUS / JR XBus (Mode B) / JR RJ-01 SMSS / Multiplex SRXL(V1+V2) / Jeti UDI EXBUS / Graupner SJ HOTT SUMD / Spektrum SRXL / Sum PPM serial signal (SPPM) / CRSF / ELRS.
 Setting RX Connection Type In FBL Setup Programming
If you're curious how the FBL system knows which RX connection method is used, it's a setting that you have to choose while setting up your FBL system (pictured in the yellow box above).
How Does Flybarless Feel / Fly?
One of the most frequently asked e-mail FBL questions I get is "how does it feel or fly compared to a flybar".
Well it is quite hard to explain in words but the heli "feels" more locked in.
By that, I mean it tracks better while in flight like it's flying on an invisible set of rails.
 Flybarless Rock Solid Stability
For example, with a flybar bird when you pitch the nose forward to get the bird into a fast forward flight direction, if you center your forward cyclic stick the heli will gradually slow as the flybar slowly tracks back into a horizontal plane causing the main rotors to do the same.
With an electronic flybar, the bird will stay pitched forward in the exact same attitude after you center your cyclic and you don’t have to keep holding in as much forward cyclic to keep it fixed at the same forward pitch angle.
This actually makes a lot of sense when you consider the same heading lock gyro technology that is used in the tail is also now being used for your cyclic. If you pitch the bird forward at a 30 degree angle – it will lock on that flight path more or less until you give a cyclic command to do different making cyclic stick counter corrections more pronounced.
Now that is a very simplified explanation of what it feels like. Depending on the setup and in many cases how the electronic stabilization is configured/programmed, you can vary the feeling quite a bit to the point they will mimic mechanical flybar response and delay fairly accurately.
Another way is to say FBL feels more like a simulator heli in some respects – but again it depends on the specific flybarless system you are using and how it is configured/programmed.
Hovering is less dramatic of a "change in feel". If you have the cyclic gains set right – the birds can hold very still and usually don't require the same level of cyclic correction from the pilot to remain perfectly steady in a hover as a flybar, but do require a little more pronounced cyclic counter corrections as I just mentioned. You still have to actively pilot them however, it is not hands off hovering by any means.
Honestly, (with a larger heli anyway), hovering either flybar or flybarless feels very similar and there is not too much difference in the feel.
A good quality & well setup flybar bird with fairly heavy paddles can be every bit as stable as the same heli with a flybarless system. I know I have had some perfectly setup and trimmed out flybared machines over the years that could hold a hands off hover for up to 10 seconds in zero wind conditions which is just as good or even better than any FBL heli I currently own.
Anyone who tells you a flybar heli is not as stable in a hover, simply has never experienced flying a top-end flybared machine. Again, that applies to larger RC helicotpers (say 500 and up) and in zero wind conditions. The smaller the heli and the windier it is, the more FBL systems help stabilize the hover - no question.
 Flybar vs Flybarless - Who's The Winner?
What Are The Benefits Of Flybarless?
As I was just mentioning – performance is a big one! Without the added drag of a flybar and the paddles, not to mention a certain amount of extra weight in all the flybar head hardware, there is an increase in power & performance.
For electric power, this also equates to slightly longer flight times. Overall flight speed is also up (again due to a cleaner head and less drag off the flybar). Only because of flybarless, are we seeing speed specific RC helicopters creeping up on the illusive 300 KPH (190 MPH) mark. Cyclic input is more immediate and less washed out feeling. The birds fly so locked in feeling and they track through the sky with amazing precision.
The other obvious advantage is the reduction in head hardware and parts count making the head build process faster/easier and crash damage both less costly, and in some cases less damaging. You are basically eliminating not only the flybar and paddles, but also the flybar mixing cage assembly, associated bearings, along with the washout base guide pins on the head and usually 4 pushrods.
In stark comparison, a pure Bell rotor head seems almost naked with only the head, the washout, and two single pushrods (for a two bladed rotor head) that go from the swashplate up to the two main blade holders.
Flybars also tend to eat up tail booms and canopies in most respectable crashes. Eliminating that long piece of steel with heavy paddles on each end twisting and flopping about like some angry ball & chain while your bird is frantically dancing around doing the "funky chicken" usually means less damage. You may come away with only a bent main shaft, head axle/feathering shaft, and fragmented rotor blades – if you’re lucky.
 Micro Size FBL Blade Nano
Tiny micro collective pitch helis like the OMP M1, Blade Nano or Trex 150X, are only possible because of their FBL electronic stabilization systems.
A complicated Bell/Hiller mixed flybar head and associated components would be so tiny and fragile, it would not be practical to use on a micro.
It's also doubtful the flybar could react fast enough on micro CP helicopters due to the very high head speeds they run at and low fly-bar mass, resulting at minimum in horrible toilet bowl effect. On top of that, micro flybarless systems are what keep such tiny collective pitch helis fairly predictable & stable; reacting and "feeling" more like larger RC helicopters.
What about looks? A flybarless head looks good – clean and simple.
 FBL Rotor Head - Clean & Simple
Flybarless Rescue Modes - Enter The 6 & 9 Axis Sensors
The latest & greatest feature offered in a growing number of flybarless stabilization systems is Rescue, Bailout, or Save modes which will level out the heli or put it back into an upright orientation when these modes are activated by the pilot.
Moreover, most systems feature an auto/self level mode that can make a collective pitch heli behave somewhat like a stable coaxial or quad rotor, while not allowing it to pitch or roll past a certain angle or can also be used a rescue or bail out function.
What is the technology behind these rescue & easy flying mode flybarless systems?
 3 Sensor IMU Consists of a 3 Axis Gyro, Accelerometer & Magnetometer
Most use 6 or 9 axis position sensors over the more common stand alone 3 axis (yaw, pitch, & roll) gyro sensor.
This multi sensor system is correctly known as an IMU (internal measurement unit).
You will (unfortunately) often see them marketed as 6 or 9 gyros which is nothing more than marketing nonsense.
We do after all live in a 3 dimensional universe, and it's impossible to detect more than 3 axis of physical spacial movement along the yaw, pitch, and roll axis. The correct term they should be marketed by is 6 or 9 axis sensors or IMU's not gyros.
The 6 axis IMU will use a standard 3 axis MEMS gyro in combination with a 3 axis accelerometer. The gyro sensors detect rotational movement around each axis, while the accelerometer sensors can reference both acceleration and gravity pull around each axis to further stabilize the heli and level it out in a bail out or save activation. Drifting still will occur however as error rates build over time.
The 9 axis IMU as pictured above adds in three magnetometer sensors on each axis which reference magnetic fields to help with the time induced drifting problem.
Problem is, all those additional sensors require a good deal more processing power as the algorithms become much more complicated; so there are trade offs to number of sensors, performance, and of course costs.
Bailout/rescue setup is also fairly complicated on most programmable FBL systems with parameters such as maximum deviation angles, gains, right-side-up correction vs inverted, and amount of collective pitch introduction & for how long in both orientations so altitude is not lost during a "save".
In other words, you have to be a pretty good CP pilot to properly setup most rescue/bailout/save FBL units even more so than the already fairly complicated process of programming & setting up a standard 3 axis gyro FBL system.
What About FBL Downsides / Disadvantages?
No, nothing is perfect and a virtual flybar is no exception.
1. COST
Cost was the biggest one (talking regular size birds here, not
micros), but the differences in prices are coming down all the time. In fact, both versions (flybar & flybarless) are pretty
much on par with each other so cost is now more or less a moot factor.
2. INCREASED SERVO DEMANDS
You will however need good high quality, high speed, and high torque digital servos for most FBL systems. Remember, the same heading hold gyro technology that is used in the tail rotor gyro is now being used with your cyclic/collective servos and therefore for the entire system to function correctly, it requires fast response times.
If you recall from the flybar page I linked to earlier, one of the other important functions of the flybar is to take some of the load off the swashplate servos. With no flybar, the servos are doing 100% of the workload to move the main rotors blades so they have to be powerful enough.
In addition to that, the servos are not only working harder, they are also working more. They are now responsible for all the little movement corrections to stabilize the helicopter that the flybar used to do. You really notice this extra work load on micro helicopters that use linear servos. The flybared versions have/had longer servo life than the FBL versions; primarily because of how much the servos have to work to stabilize the helicopter.
Most intermediate to advanced RC heli pilots will already be using good strong & fairly fast digital servos on our swashplates, but definitely double check the specs on your electronic FBL system to make sure your servos meet the speed and torque requirements, not to mention the higher power loads these servos will be pulling. This is also why long lived brushless digital servos are now becoming very popular with many RC heli hobbyists as they are very well suited to the high FBL workload (on larger RC helicopters anyways).
Setup can and usually is more complicated on a flybarless heli when compared to a flybared one. For a little background on this topic, my very first FBL unit was a HeliCommand Rigid flybarless system. I used it in my Bergen Intrepid turbine helicopter and it was a nightmare to setup correctly for my first introduction to FBL.
It literally took me months of experimenting to get it where I somewhat liked how it responded and felt. Thankfully, the setup wizards have improved a great deal over the past decade and are getting easier to configure and use. Factory out of the box settings are also generally much better now as well, and you may not even have to mess with them.
4. RELIABILITY
This was my main concern with electronic stabilization. Mechanical flybars have been around for years and are proven. Sure there are more mechanical moving parts that could loosen, wear, or even come flying off the bird if you are not looking after things. However, they would almost always give you warning signs when something was worn out and rarely would it cause a total loss of control unless you ignored it for a few more flights.
Mechanical Flybars are for the lack of a better term - more or less goof proof.
Electronics on the other hand... They can fail or hiccup due to a poor
connection, low voltage, bad solder joint, failed component, loose gyro sensor, etc. Again, not something to
dwell on and face it, when was the last time one of your tail gyros
failed in mid air? That is the question I ask myself when I’m looking
for reliability reassurance as I spool up.
UPDATE: In the past 15 years now of flying with FBL, I have yet to have a FBL related crash. I have certainly experienced some funny & weird stabilization characteristics, stabilization glitches, poor FBL programming setup/tuning on my part, and a firmware download blunder that almost drove one of my birds tail first into the ground (that was certainly a change of underwear moment); but no all out FBL in flight failures. I guess the reliability fear can now be put to rest (knock on wood).
Lastly (as I just touched on causing my underwear change) there is firmware/software updates. If you really hate performing software updates on stuff, flybarless may not be for you (at least with the more advanced higher end systems)...
It seems updates are as much part of FBL systems these days as is correct setup. The nice thing is with the internet at our fingertips, there are generally many written and video tutorials on the updates, what they do, and suggested settings to at least point you in the right direction.
In recent years, these update hassles are becoming less of an issue because manufacturers have got a good handle on things now. Remember, this was cutting edge technology 14 years ago; so much has been learned in that time frame.
Should A Beginner Get A Flybarless RC Helicopter?
Since flybared helicopters have gone the way of the dinosaur, this question is no longer relevant.
It's now a question of which flybarless system is best suited for a beginner.
Setup as I said can be more difficult & involved seeing that not only do you have to understand the programming/adjustment of the flybarless system, but on top of that, most require that you are able to at least hover and fly some simple circuits to tune them correctly. Impossible to do that if you haven't learned to fly yet!
If you have someone with FBL experience to help you out or are getting one on one lessons from an instructor who could setup the system & gains properly, then that would certainly be okay and is a great/best option.
Ready to fly helicopters that come with the flybarless systems already programmed and setup are another okay beginner option.
To really put this "difficult setup" issue in perspective, think back to simple tail gyro setup. This alone can be very difficult for a newbie to grasp and get their head around - yes?
Flybarless essentially adds two more gyros to the mix and anywhere from a few to well over a few dozen other parameters to set correctly - much of it all abstract. Mechanical setup has to be nearly perfect as well. In short, it's less forgiving to less than perfect setup than a flybar in most cases.
The learning curve for a beginner getting into collective pitch is already steep, some flybarless systems can push that curve to near vertical! Just keep all that in mind when deciding between FBL systems as some are much easier to configure & program than others.

My Swashplate Setup, Levelling, & FBL Configuration eBook goes over much of FBL setup & tuning, so if you can't get any help locally, you may be interested in it.
It not only will help you out with the setup & tuning, it shows you what's involved so you'll have a good idea before even getting your flybarless helicopter.
Again, if you wish to learn more about specific FBL systems and which are easier for beginners to start with, I cover that on my "Best Flybarless System" page.


Need Heli Help?
- Getting into the hobby but have no one to help you?
- Are you feeling overwhelmed & confused?
- Are you tired of wasting time seeking partial and conflicting information?
- Don't understand the maze of RC heli setup fundamentals?
- Is that sickening feeling after crashing turning you off the hobby?
- Are you simply ready to give up?
My RC Helicopter eBooks will help you with those exact problems. Grab your copies today.

Click Here For More Information

Click Here For More Information
Click Here For More Information
Recent Articles
-
The Ultimate RC Helicopter Tools Guide: What You Need & Why
Apr 10, 26 12:56 PM
 A complete breakdown of RC helicopter tools. Let's cover swashplate levelers, pitch gauges, hex drivers and much more to help you achieve a pro-level build.
 -
Best RC Battery Charger Guide: How to Choose the Right One
Apr 07, 26 02:29 PM
 Confused by Amps and Watts? Learn how to choose the best RC battery charger with this guide covering features, power, ratings, safety and much more.
 -
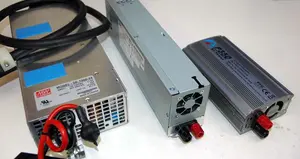
RC Power Supply Guide: Don't Starve Your RC Charger
Mar 31, 26 06:33 PM
 From low cost converted server power supplies to commercial grade options, let's find the best RC power supply for your specific RC battery charger.

