Learning The Nose In Hover
3 Ways!
by John Salt
 Learning The Nose In Hover!
Welcome To Training Day 10...
Today you will find out why the nose in hover can be so difficult for so many people, and the three ways of learning how to perform it.
Nose In Hover Instructional Video
Nose-in flying will basically take you back to day 4 almost, at least it will feel that way for some because in a way, you have to re-learn how to fly the RC helicopter.
You might be thinking you don’t have to learn the nose-in hover because you can fly the big figure 8 circuit from day 9’s lesson with no problem and are having lots of fun.
While that is true, you will never be able to progress to aerobatics if you can’t control the helicopter in all upright orientations – the nose facing you unfortunately being one of them.
Sooner or later, even if you only intend to fly the basic figure 8 circuit and normal hover exercises, you will be faced with a nose in orientation (no pun intended).
It could be caused by disorientation, a gust of wind or large torque spike causing the tail to whip around, an engine failure, tail rotor mechanical issue, or simple pilot error.
The little bit of extra effort to learn the nose in hover now is well worth it in the long haul and as stated before, absolutely essential if you want to perform even simple aerobatics.
So why is nose in flying hard?
Basically your cyclic controls are reversed when the heli is pointed towards you. When you give a forward command the heli moves toward you now instead of away from you. If you give a right cyclic command, the helicopters moves to the left.
Try it for yourself. Turn your radio and receiver on and face the front/nose of the helicopter. Give a right cyclic command and watch what direction the swash plate moves – yup, it tilts to the left.
The same direction reversal applies to the tail rotor , however if you think of a right tail rotor command turning the helicopter clockwise instead of turning the nose to the right (visa versa for a left command), it won’t matter what direction the helicopter is pointed in.
When I was learning the nose in hover, I was told by several people to watch the tail and that way a right tail rotor command will equal a right tail swing. You know as well as I did, that this is the wrong way to fly a RC heli. Always, always, fly by referencing the nose, pod, or rotor disc (flying the disc) – never ever the tail!
It is very easy to learn the clockwise and counter clockwise rotation method of tail rotor control; not only for the nose in hover, but so many other orientations. You can practice all the lessons you have learned up to this point thinking this way so by the time you are ready for the nose in flying, tail rotor control will be a piece of cake.
Throttle and collective pitch control remain the same of course so you don’t have to worry about re-learning that control movement either.
Ready to start the nose in hover exercises?
Great! Just a couple of points to mention:
- Because you are re-learning half of your control commands (cyclic roll and pitch), if you have your cyclic dual rates turned off or have set them for more travel, you might want to turn them back on or reset them at the same setting you used for your basic hover exercises so you don’t end up over controlling the bird.
- You will also likely want to revert back to your tame learning to hover pitch & throttle curves because, in a very real sense, you are relearning to hover all over again, and having that safe panic attack collective range will be most beneficial while learning nose in hovering.
- You should still have your RC helicopter training gear on. This will not only protect your heli from a possible tip over, but will also help you detect pitch and roll movements easier than if you just had the pod and landing skids as a visual reference. Again, just like when you were learning to hover tail in.
Three Ways To Learn Nose In
There are three ways that you can learn the nose in hover. Everyone learns differently, and any one of these methods might be a good match for you.
Most people prefer the ground up learning method, just like when you were learning to hover during day 4. We will start with this and then cover the other two methods – the walk around and the flying approach.
1. Ground Up Nose In Hover Exercises
As I just mentioned, this is exactly the same as learning how to hover during day 4, but this time you already know how to control the throttle/collective and tail rotor so it will not take nearly as long.
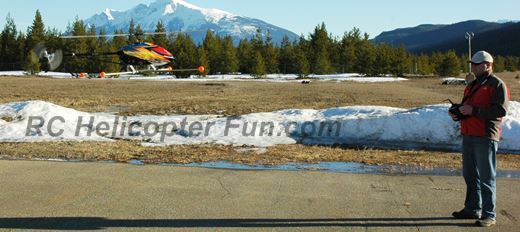
Start with your RC helicopter pointed into the wind (if there is any wind) and then stand directly in front of it about 8-10 feet away. Now slowly increase the throttle/collective to get the heli light on its skids and start getting a feel for the reversed cyclic commands. As you get a handle on the reversal, get the heli a few inches in the air and continue practicing.
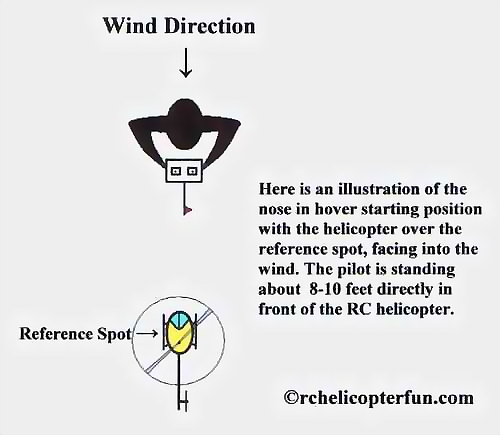
Once you are able to hold a solid hover with the helicopter, try practicing the same forward/backwards/sideways and diagonal exercises you did during day 4 keeping the nose pointed into the wind at all times (facing you). Once those feel good, try the long skinny figure 8 lesson from day 6 , but at the end of each figure 8 reach, turn the nose of the helicopter toward you instead of away from you.
Once that is mastered, start flying the large fast circuit figure 8 lesson from day 9 – again turning the nose toward you instead of away.
Make sure you have sufficient altitude to recover from a mistake. If you do get into trouble most situations can be corrected by increasing your throttle/collective and “climb” out of harms way. This way the helicopter will not hit the ground and you will have time to regain a familiar orientation and get the bird back under control.
One more tip I should mention, and this goes for whatever method you use to learn the nose in hover – make sure there is plenty of room all the way around you. It is best to practice the nose in hover out in the middle of the field in case you do get disorientated and the heli ends up flying behind you.
You should also try to go out on an overcast day in case your RC helicopter passes in front of you and the sun. You will be temporarily blinded for a few seconds by the bright sunlight. If this happens, in those few seconds you lose sight of your helicopter, chances are it will crash or you will be very disorientated when you finally reacquire its position.
Walk Around Nose In Hover Exercises
Many people are successful with this method of learning the nose in hover because it is a gradual way to change the orientation and gives your brain time to adjust. Unlike the ground up method, you start with your normal hovering position (helicopter’s nose pointed into the wind and you behind your heli).
Now, as you hold your RC helicopter in a nice stationary hover 2-3 feet off the ground, start walking to the side of the helicopter and face the helicopter from the side. Right or left side doesn’t matter, which ever feels more comfortable. The trick now is to slowly turn your body so it is facing the front of the helicopter.
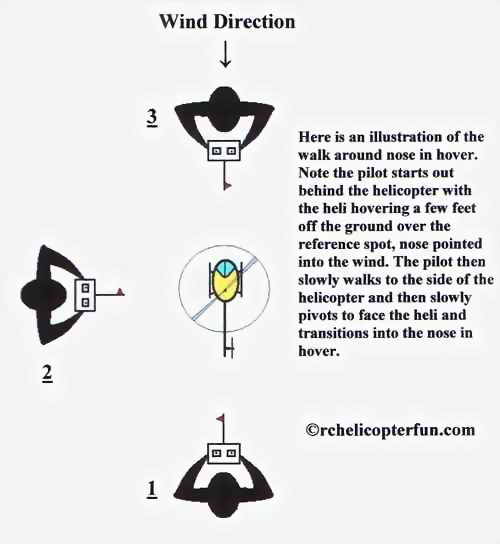
The advantage to this method is if you start feeling disorientated, you can immediately turn your body back to a more comfortable orientation. The disadvantage of course is your helicopter is a few feet in the air and if you can’t regain control fast enough – ouch $$$.
The only other concern with this method is the possibility of tripping over something while walking around to the front of the heli, so make sure to check for any tripping hazards before you begin.
Once you feel comfortable facing the helicopter, perform the same nose in exercises as described in the ground up nose in hover section above.
The Flying Approach Nose In Hover Exercises
This really isn’t a hover at all, but a way to get comfortable with the reversed cyclic controls when the helicopter is already flying and turning toward you. As you fly more and more with the helicopter turning and flying towards you, your brain slowly learns the control reversal. Eventually you will be comfortable enough to slow the helicopter down as it approaches and hold it in a nice controlled nose in hover.
The two advantages of this method are the helicopter is already in forward flight making it more stable than if it was in a hover. The other advantage is you are flying the helicopter high in the air 30-50 feet, so if you make a mistake, there is sufficient time to regain control.
The disadvantages are pretty obvious. You have to commit to turning the heli towards your position and if you get disorientated and can’t regain control, no matter how high you are, the ground will win. It also takes a long time to learn the nose in hover this way because most of your time is spent flying around and only when the helicopter is flying towards you are you getting nose in practice.
I have to mention this flying approach method because it is how I learned. I think if you already fly RC airplanes like I did, this method is actually very natural feeling because a RC helicopter in fast forward flight does behave somewhat similar to an RC airplane. It took me a long time to actually feel comfortable enough to slow the helicopter down and hold a solid nose in hover, but eventually I got it. Certainly not the best way to learn the nose in hover, but it works.
Naturally if you are learning nose in hovering this way, you won't be using the super tame learning to hover setup. You will be using the more normal flying setup that you used from day 7 onward.
Of course if you have a good RC flight simulator , your nose in hover learning curve will be much faster. The advice here is to pick one of the methods you feel comfortable with and use that same method with the RC simulator. The walk around method won’t work with a simulator because your position (the pilot) is fixed.
PRACTICE, PRACTICE, & MORE PRACTICE!
Once you are able to perform the nose in hover, it's now hard core practice time! One of the very best exercises I have found to really hone changing orientation skills to the point you don't even have to think about it is the very slow pirouette (VSP).
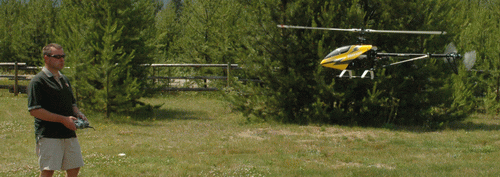
Hold in a very small amount of tail rotor, or even just click in a small amount of left or right tail rotor trim on the radio so the heli will constantly pirouette slowly. Perhaps one full 360 degree pirouette every 30 seconds or so and keep doing it for several minutes.
After that, reverse the direction of the VSP and do that direction for several minutes. This not only helps with nose in, but it forces you to experience all the other changing angles of orientation within the full range of 360 degree right side up orientations and really gets the brain working.
Since your bird is turning so slowly, you are forced to make the correct cyclic adjustments to keep it still over a fixed spot in all orientations. During a fairly fast pirouette you can "cheat your way" around by only making the cyclic adjustments during the tail in phase of the turn.
You can't "cheat" your way through a very slow piro; that is what makes this exercise so powerful. It's a really boring exercise, but once you get to the point where you don't even think about the orientation reversals and cyclic control becomes second nature, the rest of your flying will improve immensely. Confidence will be up, and those "skipped beats of the heart" moments will become few and far between.
I actually still do these VSP exercises myself all the time.
If for example, at the end of a flying day I have a few fully charged LiPo packs that I didn't use up at the flying field; after dinner that night, I'll just run those packs down to a storage state by performing very slow piros at home out in the yard. Slow piro practice time on a micro CP or simulator inside is another great way to keep honing these skills and keep "sharp".
After you find the slow piro exceedingly boring, then start performing the slow piro in increasing amounts of wind (gusty winds are the most challenging) to really sharpen your orientation skills.
Another "sharpening" skill is to preform the VSP not only right in front of you, but off to each side as well. It's funny how just moving the heli off to the left or right of what you are used to can really mess up your VSP comfort zone and introduce a new challenge.
Finally, if and when you get into inverted hovering, these same very slow piro exercises while inverted will give you a very solid confidence building foundation to start practicing pretty much any trick in the book.
What's Next?
With the nose-in hover under your belt, you now have the confidence and skill to fly your RC helicopter no matter what upright direction it's pointed.
Congratulations are once again in order!
Give yourself a well deserved pat on the back! Your reward for today... Take the training gear off your RC helicopter - you are now an RC heli pilot :-)
Some people will be more than happy and entertained with these basic, yet fundamental upright RC helicopter flying skills for years to come.
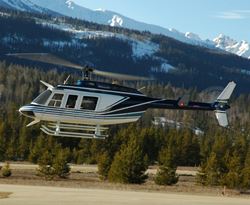 Flying a scale RC helicopter to look & behave like full size is very rewarding.
For example, if scale is your area of interest where you won't be flying inverted, you really don't need any more.
You will however be honing all these upright RC heli flying skills to make your smaller scale RC helicopter fly and behave like a full size helicopter does. That requires a good deal of practice to be become an ultra smooth & fluid flyer.
For others who want to get into sport, F3C or 3D, where you will also be flying inverted, the learning curve has only been scratched, and months to years of further instruction & practice remain.
If you're ready for that next step, I cover it on the How To Fly 3D RC Helicopter Aerobatics page.
That is why I often say this hobby can provide years of challenge if you wish it to. There is ALWAYS something new to learn no matter how proficient you get.
Humbling - Yes!
