Using RC Helicopter Training Gear
Ground Hover Exercises
by John Salt
Welcome to training day 3...
Today we will talk about RC helicopter training gear and you will start with your ground hover exercises. Today will be very fun and you will be learning how to actually control your helicopter.
Today is also safe for your helicopter as long as you don’t try to fly and you have a tame learning to hover setup as mentioned on day 1. The goal of today is to move your helicopter around on the ground with perhaps a small hop or two.
The key word of today is control.
RC Helicopter Training Gear

Before we start our ground hover exercises, let’s talk about RC helicopter training gear seeing that you must have a set on your RC helicopter when you are first learning.
Yes, even with today's self level RC helicopters because as we already addressed, if you are learning correctly, you won't have self level turned on. Moreover, heli training-gear provide increased visual presence allowing you to react faster with control corrections. More on this shortly.
RC helicopter training gear is simply some wooden, fiberglass, or perhaps carbon fiber sticks arranged in a cross or "tic tac toe" pattern with light plastic balls on the end of each stick. The plastic balls prevent the sticks from jamming into the ground as the heli floats and bobs along the ground.
You can purchase a set of RC helicopter training gear for about $20-$40 bucks (for larger helicopters) or build a set for much less.

Training gear also works very well with micro sized RC helicopters as shown here with a Blade Nano.
This homemade set cost less than $6.00 and is much stronger than most micro size store bought sets. It's also perfectly "sized" to the heli.

This e-Book I have written goes through the entire process of how to build your own set of RC helicopter training gear.
Correct sizing is explained and what materials you need. Fully illustrated, this little book shows how anyone can turn out a very nice looking and functional set of RC helicopter training gear and save money doing it.
If you want to learn more about what's inside the eBook, just
click of the image of the book to the right.
Most people I have instructed build their own RC helicopter training gear seeing that after a couple weeks to a couple months, they don’t need them anymore - and it's one way to save some money in this hobby.
The Ground You Learn On
Let’s talk about the actual ground you will be performing your ground hover exercises on. Most people will assume you want nice soft thick grass – this is fine once you are comfortable with hovering at 2-3 feet off the ground ( day 5 lesson ), but is not good for the ground hover exercises.
The very best surface for learning your ground hover exercise is actually flat packed snow or ice, followed closely by smooth concrete or asphalt. The whole idea behind the ground hover exercise is to get comfortable moving your helicopter along the ground in all directions while it is very light on the skids. If you are in thick grass, that is impossible. Very short grass will work, but you almost have to be flying to get the heli to move – it is also easier to tip the helicopter over.
If you do find a nice large paved area to practice your ground hover exercises, make sure it is clean and not full of dust and or gravel – not good for an electric bird, and catastrophic for a nitro bird – remember, day 3 is all about staying on the ground. No pot holes, sewer grates or curbs either.
Ground Training Flybarless Caution
As I mentioned on my Flybarless Page,
some electronic flybarless stabilization systems can do funny things
while the heli is on the ground and the cyclic gyros are in a feedback
loop.
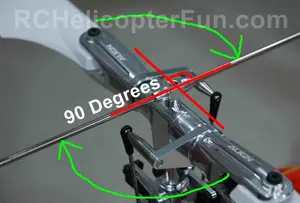
The swashplate can drift off level if you are holding in even a slight amount of cyclic stick when they can't detect any pitching or rolling movement (which is the case much of the time while you are performing ground hover exercises).
This is very dependent on the specific flybarless system and the amount of "centering/leveling decay" (how quickly the FBL unit levels the swash after a cyclic command) that is programmed into the FBL unit either by the user or by the manufacturer.
Most FBL units today can be used with training gear without issue as much of the earlier "feedback bugs" have been sorted out.
Like I show on Day 10's nose in training, the FBL heli I was using worked perfectly fine so it just something to be aware of with some FBL systems.
Again, when in doubt on a new or unfamiliar FBL system, keep a close eye on the swashplate when you are first starting this exercise to make sure you don't see it drifting largely off level while not even touching the cyclic stick as you slowly spool up.
If it is drifting off level, chances are you are not going to be able to practice ground exercises with your particular FBL unit, or you will have to update to newer firmware that allows it or change your decay setting.
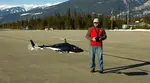
Ground Hover Exercises
This is where the rubber meets the road, or in our case the RC helicopter training gear slides on the asphalt.
What’s the first thing you do?
Remember the last topic discussed on day 2.
Yup, perform a radio system range check.
Radio range check good, no spectators around, and not much if any wind – perfect!
Place your helicopter in the middle of the area you have selected and make sure it is facing into the wind (if there is any wind).
If this area has a marking or if you can put a small marking on it, place your heli over this mark – this will be called our reference point.
Start your helicopter and stand directly behind it 10 feet or so.
Now increase the throttle slowly to get the heli light on the skids/training gear and watch what happens. I can almost guarantee if you have a clockwise rotating rotor blade the helicopter will want to drift to the left because the tail rotor is blowing air out to the right (vice-versa for a counter clockwise rotating rotor).
You will most likely have to add a little bit of right cyclic trim with a flybared machine - Never add cyclic trim on flybarless because the FBL unit will see that as a small cyclic command and slowly cause the swash to drift off level.
Don’t let the heli drift away, as soon as it gets light enough on the skids and starts moving, throttle back and make the correct trim adjustment.
How about forwards and backwards? Again add trim to so the helicopter wants to more or less stay at that reference point.
If you have a heading hold gyro, it should be doing a pretty good job keeping the nose pointed forward. If your gyro doesn’t have a heading hold function or you are flying in rate mode, you will most likely have to play around with your tail rotor trim to keep the heli pointing in one direction.
You will also notice with a rate mode gyro, if you increase the throttle/collective stick too rapidly, your heli might want to spin left or right, this is because you don’t have your tail rotor compensation set correctly. If you find your heli spins counter clockwise (to the left) with a clockwise rotating rotor, you don’t have enough tail rotor compensation, if it is opposite, you have too much. Adjust it as per your radio manufactures instruction.
If you have a heading hold gyro, you don’t have to worry about this function at this beginner stage of learning.

Okay, time to take a breather. How did it go? Did you get your dynamic trim adjustments sorted out? This can take a bit of time, and remember there are many forces at play so don’t get frustrated if the helicopter won’t stay over your fixed reference point – remember, helicopters are unstable and it takes constant control corrections to keep them in a stationary position.
The point of the above adjustment procedure was to make sure the helicopter is now more or less in trim so it won’t always want to drift forwards or sideways or whatever – it should now be acting like a ball – it will drift in any direction when you get it light on the skids.
The easiest way I can describe how a RC helicopter behaves when it's hovering or is light on skids is kind of like trying to keep a marble dead steady on a serving tray while jumping up and down.
Now it is time to start controlling this marble or ball. There are several key points to remember when you are first starting out and these will hold true no matter how far you progress flying RC helicopters.
- Always have the nose of the helicopter pointed into the wind when starting out (if possible).
- Always fly the helicopter by looking at the nose or pod section.
- Never fly the helicopter by looking at the tail boom or tail rotor.
- Always start your first flight of the day standing behind the helicopter (nose pointed forward/tail-in orientation) so you don’t get disorientated.
Okay, let’s start the helicopter over that reference point and slowly increase the throttle to get it light on the skids and try to hold it at that point. If it drifts a little to the right give a little bit of left cyclic to bring it back – if it starts drifting backwards, give a little bit of forward cyclic.
The main goal is to get a feel of how sensitive the controls are and not to over control the helicopter. Small amounts of stick movement is all it takes.
Now that you can hold it at the reference point, it is time to start moving your RC heli around. With the RC helicopter training gear on, you will be able to slide your heli around on the ground without it tipping over.
Start again with the helicopter over the reference point and get it light on the skids with the nose pointing into the wind.
Now move the helicopter forward with a small forward cyclic command and slowly slide the helicopter about 10 feet in front of the reference point and throttle back. You will most likely have noticed you had to give small amount of right or maybe left cyclic commands to keep it going in a straight line. You might have had to give some small tail rotor corrections as well to keep the nose pointing forward.
Okay, now let’s throttle up getting the bird light on the skids again and bring the helicopter back to the reference point with a backwards cyclic command stopping again at the reference point and taking a breather if required.
Sliding most RC helicopters backwards on the ground, even with training gear on is a little harder since the tail fin/rotor can easily hit the ground.
The danger here of course is driving the tail rotor into the ground and doing significant damage to your tail drive.
If your rear stabilizer fin is strong and long enough (most are) this is not a problem - the fin will simply scrape along the ground and protect the tail rotor.
I wanted to make you aware of this, and if your tail rotor blades do come very close to hitting the ground during backwards ground sliding, you will have to be very careful, extend your tail fin, or omit this backwards exercise all together and carry the heli back to the reference spot.

Here's an example of an extended tail fin I custom built out of 1.0mm carbon fiber sheet for a student who was having tail strike issues using the shorter stock fin (the one I'm holding on the left). To make it even easier for him, I fit a small, lightweight foam wheel to the bottom of the new fin so the fin would not jab into the ground as easily (he only had grass to practice on). This saved his tail rotor and drive gears a lot in his further lessons.
Now let’s continue moving backwards towards you, stop when the heli is getting close to you and then move it forward back over the reference point. Now do the same exercise to the left and right, keeping the nose facing into the wind and stopping each time over the reference point.

Once comfortable with forwards/backwards/left/right - start doing diagonals away from the reference point and coming back to it.
Perform a forward right diagonal, forward left diagonal, backward right diagonal, and backward left diagonal.
The diagonals will be much harder than the simple forward, backward, left, right exercises because you will be using all your cyclic commands together and perhaps even some tail rotor to keep the nose always pointing forward.

Once you get comfortable with all these movements, stop resting each time at the reference point, just pass over top of it and keep going.
The whole idea of these ground hover exercises is to get you 100% comfortable with how the controls work and get a "feel" for the helicopter. This is critical before you get into low hover exercises so you don’t over control the helicopter or become disorientated.
You might think this sounds really simple, chances are if you have been practicing on a simulator it will be. But it can be very exhausting – don’t forget to take a rest if you are getting tired – you are learning new motor skills and hand eye coordination – some people catch on fast, others take days or longer.
Just remember this is not a race, progress at your own comfort level. Keep an eye on that RC helicopter training gear as well to make sure it is not coming loose from all the vibrations and sliding around on the ground.
With day 3
over you should be feeling pretty good right now. Your helicopter is
still in one piece and you actually got to see it moving around, but
didn’t see much if any light under those skids yet. That is about to change...
Onto day 4 - the most exhausting day for most people, but also the most rewarding. So get your rest, tomorrow is a big day!


Need Heli Help?
- Getting into the hobby but have no one to help you?
- Are you feeling overwhelmed & confused?
- Are you tired of wasting time seeking partial and conflicting information?
- Don't understand the maze of RC heli setup fundamentals?
- Is that sickening feeling after crashing turning you off the hobby?
- Are you simply ready to give up?
My RC Helicopter eBooks will help you with those exact problems. Grab your copies today.

Click Here For More Information

Click Here For More Information

Click Here For More Information
Recent Articles
-
Understanding Gyroscopic Precession In RC Helicopters
Mar 12, 26 05:15 PM
 What is Gyroscopic Precession and how will it affect phase lag in your heli controls - or does it?
 -
FunKey Fuselages Review - Outstanding Scale Helicopter Quality
Mar 11, 26 05:35 PM
 Funkey fuselages are some of the best quality fiberglass scale RC helicopter fuselages available. Let's find out why along with sizes & models available.
 -
Scale RC Helicopters - What You'll Need To Know & Best To Get.
Mar 10, 26 08:03 PM
 Scale RC helicopters - what skills you'll need, what's a good scale heli to start with, & much more.