Blade CX3 Tips, Settings, & Help
Many Of These Tips Work With The CX2 As Well
by John Salt
 The Blade CX3 Remains To Be One Of My Favorite Coaxial RC Helicopters
This Blade CX3 tips and help page covers the following 12 topics:
1. Programming & Setup Values For The CX3 (DX6i example)
2. Bind-n-Fly Procedure
3.
Toilet Bowl Effect (TBE)
4. Tail Drift
5. Tail Twitch
6. Spinning/Yawing Tail
7. Dealing With A Scale Fuselage
8. Fitting The Battery
9.
Understanding & Care of RC LiPo Batteries
10.
Navigation LED Lights Upgrade
11. Additional Recommendations & Tips
As I mentioned on my Blade CX3 Review page , I have a Spektrum DX6i that came with the Blade 400 and a DX7 so I naturally purchased the CX3 Bind-n-Fly version.
The instructions that came with the CX3 did a good job of explaining the basic bind procedure, but unfortunately do not walk you through the correct settings.
Once again, I am using a DX6i radio, but if you have any of the computerized DSM2 Spectrum or JR radios, the procedure will be more or less the same; the setup values will be identical.
Blade CX3 Tips #1 - PROGRAMING AND SETUP
- Turn on your radio on and click the scroll knob to enter the “Adjust List” menu screen. Scroll down to “Model Select” (#1 on the DX6i) and click the scroll knob. Scroll through your list until you come up with an empty or blank memory location (if this is a new radio, all memory locations should be empty). Once selected, the radio indicates it’s “downloading” all programmable fields on this new model (which of course now has to be programmed).
- Scroll down to “Setup List” (#9 on the DX6i) and select it by clicking the scroll knob. You should now be in the Setup List menu.
- Scroll down to Model Type (#1 on the DX6i) and click on it. Select Heli and click again. The radio has just configured this new memory location with heli software in order for you to program the necessary helicopter specific fields.
- Now (while still in the Setup List) scroll down to “Model Name” (#2 on the DX6i) and click on it. The screen should indicate the Model Number and if you scroll down, a black high-lit area under the model number will appear, click on it. Now by scrolling and clicking, enter the name of your model – in this case CX3 or something similar. Your new memory location now has the model type and name programmed; now it is time to program the various fields.
- Remaining in the Setup List menu, scroll down to “Reverse” (#4 on the DX6i) and as per the instructions that came with the Blade CX3, set the Aileron, Elevator, and Rudder all to reverse, the rest of the channels remain at normal.
- Still in the Setup List, scroll down to “Swash Type” (#5 on the DX6i) and select 90 degrees. This one caused me some issues as the swash looks like it is set up in a 120 degree CCPM orientation, which of course it isn’t. After I realized the gyroscopic precession that is acting at approximately 30 degrees, it made total sense. Special Note... If you have a DX7 radio, use the 90 degree - one servo - no swash mix, swash type.
- The only other field you may want to program while still in the Setup List menu is the timer (#8 on the DX6i). It is personal preference and determined on how and where you fly your CX3 as to what timer values you set. You should be able to get at least 8 minutes out of a fully charged 800 mAh battery unless you are flying it very aggressively. You may want to start at 7 minutes and go from there. I do recommend you set up the timer in “Count Down” mode and use it every flight. There is little warning on the CX3 when the batteries are getting low, so it is nice to have a timer telling you when to land.
- Now that the necessary “Setup List” menus have all been programmed, scroll down to “Adjust List” (#13 on the DX6i) and click back into the “Adjust List” menu. The settings I have come up with were obtained over the course of around 50 flights on the CX3. I feel they offer the best combination of both control and performance. You may want to adjust or modify them, but they should give you good starting points.
Important!
There are a few people who have been experiencing a constant pirouette after binding their CX3's to the DX6i. This is not an issue with how you bound it, programmed it, or my settings. Horizon Hobby has unofficially recognized that there are some 3 in 1 units that once bound to the DX6i will not power the lower rotor. The only fix is a new 3 in 1.
Adjust List Settings
DUAL & EXPONENTIAL RATES SETTINGS
Switch position 0:
-Aileron 100% - Expo +15%
-Elevator 100% - Expo +15%
-Rudder 100% - Expo 20% (gives a pirouette rate of approximately 3 pirouettes per second)
These “position 0” settings will give full cyclic control for more aggressive flight, or when outside and you need maximum cyclic to overcome any small breeze.
Switch Position 1:
-Aileron 75% - Expo +10%
-Elevator 75% - Expo +10%
-Rudder 50% - Expo 20% (give a pirouette rate of about 1 per second)
These position 1 settings will give a very controllable and docile bird while flying indoors. If this is your first time flying the CX3 with or without training gear, I would recommend using these values.
TRAVEL ADJUSTMENT SETTINGS
All channels set to 100%
SUB TRIM SETTINGS
Start out with all set at 0. The only two channels you should need to adjust are Elevator and Aileron to compensate for any unwanted cyclic drift. You may have to use rudder sub trim, but it is best to use the Main Motor Proportional Trimmer Pot on the 3-in-1 unit - more on this topic under Tail Drift.
GYRO SETTINGS
Use these settings if you want remotely selectable gyro gain by plugging the yellow remote-gain wire from the 3-in-1 unit into the receiver’s “Gear” channel. -SW = Gyro
-Switch Position 0 - 35%
-Switch Position 1 - 45%
I discuss these gain settings in more detail under Tail Twitch.
FIVE POINT THROTTLE CURVE
With the CX3, I only programed 2 throttle curves... One for normal flight mode and one for throttle hold. You may wish to program a stunt curve, but on a simple fixed pitch coaxial, I didn’t see any point to it. HOWEVER; if you have the remote LED kit you will need to set a pitch curve - WHY? I have the procedure on my CX3 LED tips page .
I do have a throttle hold programmed so the heli can be made safe by selecting throttle hold so the rotors won’t spool up if the throttle stick is bumped accidentally.
I also like butter smooth throttle response in the mid stick hover range for better hovering & lift control. This is hard to achieve on an electric micro coaxial helicopter with a basic linear throttle curve; once again proving that computerized radios with programmable throttle and pitch curve settings can be just as beneficial with a simple micro coaxial heli.
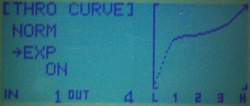 CX3/2 Throttle Curve
Here is the exact throttle curve I am using on both the DX6i & DX7 to give a mid stick hover and very smooth power output for increased hover control. Note on the DX7 I have turned on exponential to smooth the curve out even further.
-Low Stick = 0%
-Stick Position 2 = 60%
-Stick Position 3 = 65% (mid stick hover)
-Stick Position 4 = 75%
-High Stick = 100%
Not everyone will like this throttle curve I realize, but if you want increased hover control and a smooth power band in the mid stick range - give it a try. For throttle hold, all stick positions are set to 0%.
PITCH CURVE & REMAINING FIELDS
-Pitch Curve... Nothing to set unless you have the
remote LED kit
.
-Swash Mix... Inhibited with 90 degree swash selection
-Mix 1 & 2... Inhibited
-Revolution Mixing... Inhibited
Quite the process right? Too-bad it wasn’t in the manual; it would have made my life and yours a little easier I am thinking.
Blade CX3 Tips #2 - BINDING THE DX6i
Now that all the fields have been programmed, it is time to bind this baby. When you bind a DSM2 receiver to a DSM2 radio, all the trim and stick positions are recorded in the receiver for fail safe. This means, if you ever loose radio signal while flying, the receiver sets all channel outputs to the positions that it saw during the binding process.
For safety reasons, you always want your receiver to set throttle to 0% as it binds and stores the fail safe settings. Make sure when you’re binding your bird, you have the throttle stick in the low or off position and all other sticks at neutral.
All set? Turn your radio off and plug the bind plug that came with your CX3 into the BATT input on the AR6100e receiver. Power up the receiver by plugging the Li-Po battery pack in. The orange LED in the receiver should be blinking rapidly right now.
Now, hold the trainer switch on (pulled forward) on your radio and then turn on the radio. The radio’s LCD display will indicate it is in binding mode and will be beeping. Keep holding the trainer/bind switch on and within a few seconds, the orange LED on the receiver will stop flashing and stay on solid – your bird is now bound and setup (don’t forget to remove the bind plug).
Blade CX3 Tips #3 - Toilet Bowl Effect - click here
Blade CX3 Tips #4 - TAIL DRIFT
Before I start on this, it may help you understand how a heading lock gyro works and its limitations.
If you don’t know what or how a heading hold/lock lock gyro is, you might want to click on that topic to read more about it.
Heading lock gyros are designed to help keep the nose of the helicopter from drifting due to external forces acting upon the heli such as a cross wind, violent torque changes, or the weathervane effect during fast backward or sideways flight.
Now, a small micro coaxial won’t fly in any kind of wind so we can take wind out of the equation.
It will fly backward and sideways however with enough speed to cause it to weathervane and point the nose in direction of travel.
With the large surface area of the tail boom on the MD520N fuselage, this becomes even more important.
I wouldn’t say the heading lock gyro in the 3-in-1 unit on the Blade CX3 is great, but it works fine for what’s required on a micro coaxial.
For instance, if you hover the CX3 in front of you and reach out and give the tail a light push to the side, the gyro is not going to correct and get the heli pointing back to the exact same heading it was pointed in before you gave it a push. You will see it move slightly back towards its original heading however, and this is the difference between doing this experiment on the CX3 compared to the mCX or CX2.
This limited heading hold is certainly enough to keep the weathervane effect from occurring and I can fly my CX3 very quickly sideways or backward without any weathervane effect – it works well for this and that is all that is required on a micro coaxial.
Another good test of the heading hold ability on the Blade CX3 is to perform a “pogo stick” maneuver. This is where you increase the throttle and decrease it rapidly over and over so the helicopter is going up and down mimicking a pogo stick. With a yaw rate gyro in a mCX say, the heil will not maintain a heading that well as the changing torque loads are violent and drift is unavoidable so constant corrections during the pogo are required. The Blade CX3 with its heading hold gyro on the other hand can do very nice pogos without loosing the heading – pretty impressive for such an inexpensive helicopter.
So what causes tail drift and is there a cure?
Tail drift is caused by the vary nature of how a piezoelectric ceramic gyro crystal works (the type of gyro technology that is used in almost every RC helicopter gyro on the market). I won't get into the physics of it, but the short story is as the crystal and the circuit board in the gyro heat up or cool down, very tiny amounts of changing stress loads are placed on the crystal causing it to deflect the slightest amount. This is what causes the drift, the gyro sensor is no longer calibrated in a neutral position.
Very good and expensive gyros that cost more than the entire Blade CX3 heli have sophisticated circuitry and/or software algorithms to compensate for temperature drift issues. That of course is not the case with an inexpensive micro coaxial, nor should it be expected in this level of helicopter with a low cost gyro crammed into a micro sized 3 in 1 control unit that gets pretty warm during a flight.
The Fix
Fortunately, the Blade CX3 can be adjusted so tail drift issues are very acceptable and will only require a few clicks of tail rotor trim throughout the flight to compensate - yep, you have just become the sophisticated circuitry and software used in expensive gyros.
The first thing to remember is that the Blade CX3 uses a heading hold/lock gyro. This very important to understand. Every time you plug in the battery and the gyro initializes, the gyro will take what ever tail rotor stick and trim position reading and lock it as the neutral reference point. Now as the 3 in 1 circuit board heats up during the flight, a little drift will start happening (most likely to the right). Now you give a little left trim to compensate and the bird is good for the rest of the flight.
Here is the important point to remember. MAKE SURE YOU RESET YOUR TRIM BACK TO NEUTRAL BEFORE THE NEXT FLIGHT. If you don't, the heading lock gyro will see your left trim as the neutral position when you power up the CX3 and once again you give a couple more clicks to the left during the flight to compensate for the right drift. In a few flights if you never center your tail trim, you will have your trim all the way to the left with no more adjustment range possible. If you are using a computerized radio, ensure subtrim is also zeroed out.
I actually give a click or two of right trim before I power up the Blade CX3. When first powered up, the gyro will see this as the center position. As the gryo warms during the flight and the resultant right drift comes into play - I now have a good deal of left trim range, even though I will only need a few clicks, I like to have my trims more or less centered (just a habit).
The next important item to adjust is of course the mixing pot on the 3 in 1 unit. Because the CX3 uses a heading lock gyro, the mixing adjustment works differently than on a CX2 or mCX. The gryo is actually very capable of compensating for out of adjustment mixing, but a mixing board and gyro fighting against each other is not what you want.
First thing to do - disregard what the instructions say about the mixing adjustment! What worked on the CX & CX2, doesn't work well on the Blade CX3. Thanks to the heading lock gyro, setting up the mixing on the CX3 is much easier. Just center the mixing pot and perform some pirouettes. The idea is to get the mixing adjustment so the Blade CX3 will pirouette left and right at the same rate.
Before I set the trimmer pot correctly, my Blade CX3 would turn faster to the right than to the left (about three and a half pirouettes per second to the right and only about 2 per second to the left). Now I am getting around 3 per second both left and right.
These settings made such a huge improvement in my Blade CX3. I can hover for well over a minute with very little if any drift and I have consistent pirouette rates in both directions.
Blade CX3 Tips #5 - TAIL TWITCH
There are three things that cause tail twitch on the CX3 or any RC heli for that matter.
- Too much vibration that the gyro miss-interprets as yaw movement
- Too much gyro gain (gyro set too sensitive)
- Inherent slow response from electric motors correcting for fast gyro commands
The first two are easy to fix and cured 75% of the tail twitch issues on my Blade CX3, the last one is an inherent problem with fast gyro / slow electric motor combinations. E-flite has published fixes on their web site to deal with this twitch issue. These fixes work for the most part, but there is more to it than just turning down the gain and adding some double sided foam tape to the front landing struts to isolate fuselage vibration.
Vibration Fixes
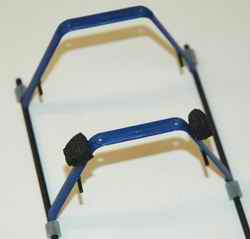 CX3 Vibration Foam
I actually don’t recommend using double sided foam tape to isolate fuselage vibrations from the frame since it may stick the fuselage to the strut and it is easy to crack the fuse if you have to remove it. Instead - I used some foam weather stripping cut into two very small cubes; this works much better and is way more secure.
Remove the factory blue foam from the front struts so the new foam can stick and you will have a very secure fuselage with next to no vibration transmission to the gyro. It is easy to take the fuse off since is it is not stuck to this foam now.
That cured maybe 10% of my tail twitch. To be honest, this modification had little effect on my twitch reduction, but it does hold the fuselage much better.
So, I still noticed and felt a strong vibration. I thought I had a
bent lower or upper main rotor shaft because I could see the upper
rotor head wobble ever so slightly. I measured both shafts for run-out
with a dial indicator – perfect! I traced the problem to the plastic
upper bearing support (part # EFLH1217).
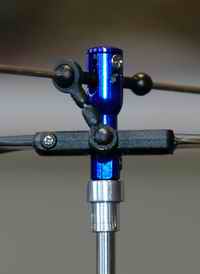 CX3 Bearing Holder
This bearing support was not running true and as a result, the upper shaft was wobbling in relation to the lower shaft causing significant vibration. This might have been a “one of” or perhaps is a common problem – I honestly don’t know.
As you can see in the photo to the right, I machined my own bearing holder and it cured the vibration – UREKA! You of course don’t have to machine your own bearing holder. E-flite has an upgraded aluminum bearing holder (part # EFLH1244).
I highly recommend this upgrade for the CX3, and is only one of two aluminum upgrades I suggest - more on that CX3 tips topic under the Additional Recommendations section of this page.
Gain Fix
Too much gain is easy to fix, turn down the gain. If you are binding your Blade CX3 to a good programmable computerized radio, definitely use the remote gain feature. The settings of 35% and 45% I gave in the programming section give the best combination of tail holding and twitch elimination on my CX3.
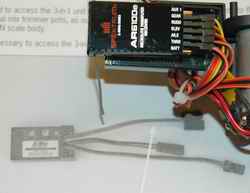 CX3 Remote Gain Wire
In the picture to the right, you can see how the yellow gain wire from the 3-in-1 unit is plugged into the 6100e receiver's "GEAR" channel. Now you can easily program your gain and toggle it between a higher and lower setting.
The 35% setting gives a more docile rate like feeling to your tail. It won’t stop the tail on a dime, but it is very nice for scale type flying where a robotic tail lock looks unnatural. Remember also, the higher the gain value, the slower your pirouette rate will be; so for super fast pirouettes, stick with 35% or even a little less.
45% gives more of that “robotic” tail lock feel and a slightly slower pirouette rate. Any more gain, will likely be too much for the slow response of speed controlled main rotors. This brings us to inherent tail twitch.
Slow Motor Response
After isolating / eliminating vibrations and turning down your gain, you may still notice the occasional twitch. This one almost seems like a glitch or radio interference by the intermittent nature in which it occurs. If you have ever flown a rotten electric tail rotor RC heli with a high gain rate it is the exact same symptom just not nearly as severe on the CX3.
My little mCX does this too, but it doesn’t seem as pronounced. In my opinion, I think the heading lock gyro coupled with the slow reacting main rotors is making this twitch more noticeable than if a simple yaw rate gyro was used.
Why?
Let’s say the gyro sees a yaw to the right, unlike the rate gyro that just dampens this movement, the heading lock gyro dampens it and then sends a command to yaw the tail back to the original heading. The rotors of course can’t speed up and slow down instantaneously to correct the heading and the gyro sends even more correction, now once the rotors finally do speed up and slow down enough to make the correction it is over corrected and the gyro makes a sudden and pronounced counter correction.
If you experience this sudden twitching on your Blade CX3 you will notice that it behaves exactly this way. The neat thing is the gyro always returns the CX3 to its original heading after this “glitch twitch” as I call it.
So is a heading lock gyro a bad idea on a micro electric coaxial?
I certainly enjoy flying the Blade CX3 more than my mCX with the improved performance, so in my opinion, the benefits of a heading lock gyro paired with mediocre responding rotors is worth it. Besides, the exact same twitch happens on my mCX as I said, and I have seen it on the CX2, it is just not as noticeable.
Blade CX3 Tips #6 - Spinning & Yawing CX3
I have been getting this question a lot - "My CX3 or CX2 keeps spinning - why?"
The first thing you have to determine is what direction the heli is spinning/yawing. The upper rotor is responsible for stopping a left or counterclockwise yaw. The lower rotor is responsible for stopping a right or clockwise yaw.
There are two main mechanical reasons these yaws start up - usually after a repair, but not always.
If your CX2 or 3 is spinning to the left (counterclockwise) this means the upper rotor is not turning fast enough. This is usually accompanied by a reduction in lift or not even being able to get the heli off the ground. Check the lower gear collar set screws for tightness on the upper rotor shaft. If you hold the gear and try to turn the upper rotor this is an easy way to make sure the set screws are tight. If you can spin the rotor while holding the gear - you have a problem. The upper shaft has a flat on it to accept the one set screw, confirm the set screw is indeed applying pressure to this flat spot and tighten as required. Confirm the shaft is no longer slipping within the gear.
IF your CX2 or 3 is spinning to right (clockwise) this generally means the lower rotor is not spinning fast enough. The most likely culprit here is the brass washer between the upper gear (lower shaft gear) and lower bearing block has been installed upside down. There is raised ring on one side of this washer - it must be facing up to ride on the bearing race. The other possibility, especially if you have pets is a piece of hair wound around that location, between the two gears, or between the upper bearing holder and collar. Check the bearing between the lower shaft and upper rotor head as well.
Electronic faults within the 3 in 1 (4 in 1 on the CX2) or a motor fault could also cause never ending spinning, but in most cases the problem can be traced to one of the mechanical issues listed above.
Blade CX3 Tips #7 - THE MD520N FUSELAGE
The very best feature on the Blade CX3 is of course the highly detailed MD520N fuselage. This thing just looks so great when you see it flying, you can’t help get a silly grin on your face – at least if you are into scale helis and like the MD520N as much as I do.
Just like any scale RC helicopter, the CX3’s MD520N fuselage hides all the mechanical components and has to be removed if you need to perform any work on the heli (other than rotor repairs of course). The great thing about the Blade CX3 is it has one of the easiest to remove scale fuselages going. 10 screws and 2 minutes is all it takes – this is such a nice feature compared to so many other complicated scale fuse removal procedures.
CX3 Fuselage removal procedure... 6 easy steps
- Remove all 4 screws that hold the main rotor blades to the upper and lower rotor heads.
- Remove all 4 rotor blades (being extra careful when removing the swash ball links and flybar ball link off the rotor balls).
- Remover the 2 screws that hold the upper rotor head cap and remover the cap.
- Remove the flybar.
- Remove the 4 screws that hold the front and rear battery support to the frame and remove the battery supports/landing struts as one complete unit.
- Remove the body mount rod, tilt the main frame forward inside the helicopter and move it rearward so the receiver and 3-in-1 unit have sufficient clearance to remove the entire mainframe assembly out the bottom of the fuselage.
For a full scale fuse, it doesn't get much easier than that.
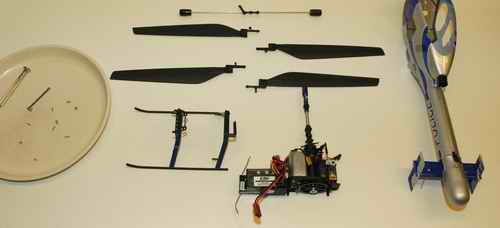 Fuselage Removed Off CX3 - Pretty Easy
Blade CX3 Tips #8 - Fitting The Battery
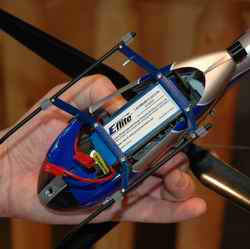 Holding Frame For Battery Removal & Insertion
It took me a little time to figure out the best way to insert and remove the battery but I think this way is the best.
Hold the helicopter upside down by holding onto the frame or
motors between your thumb and index finger through the fuselage door
openings. This makes it possible to fit and remove that battery easily
without putting any stress or strain on the fuselage.
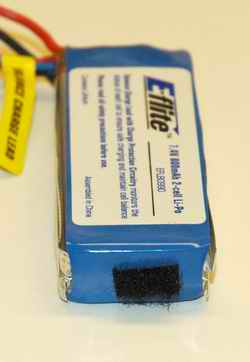 Little Piece Of Velcro On End Of Battery
Speaking of the battery, more specifically the Velcro that holds it to the rear battery support – don’t use the entire piece that comes with the kit. This makes battery removal unnecessarily difficult. All you need is a very small piece stuck to the back of the battery to prevent it from sliding forward.
The piece of Velcro that comes with kit can be cut into 3 equal size segments that will be more than sufficient to hold the battery in place. The extra pieces can be used on your extra battery packs then.
Tips # 9 - Understanding & Caring For RC LiPo Batteries - click this link
Blade CX3 Tips #10 - LED Navigation Lights - click this link
Blade CX3 Tips #11 - ADDITIONAL RECOMMENDATIONS & TIPS
Motor Cooling
Just like the CX2, the motors on the Blade CX3 do get pretty hot during a flight, especially if you are really pushing them. I highly recommend the E-flight Main Motor Heat Sink for the CX2/3 (part # EFLH1208). This inexpensive heat sink will add life to your motors but but not much extra weight to your CX3 heli.
Stay Away From Aluminum Upgrades...
Other than the bearing holder and the heat sink, don't put one extra penny into aluminum upgrade parts! You heard me right... I warn of this in my one e-book on the Blade 400 and it is even more important on small micro coaxials. Aluminum adds weight, and extra weight on a micro electric coaxial means:
- Less flight time
- The battery will run hotter, potentially shortening its life
- The motors run hotter
- More weight causes more damage to the heli in a crash
- More weight will over flex the blades and will cause blade strikes
- More weight decreases the climb out and speed of the heli
- More weight means the 3 in 1 will have to work harder and may overheat. The red LED on the 3 in 1 unit is a good indication that it is being over worked.
It is that simple. Aluminum parts are expensive and although they might be stronger, the additional weight and loss in performance is not worth it. I am working on an entire page about upgrades for the weaker plastic parts on both the CX2 and CX3. YES, there is a solution if you keep breaking things or want increased performance.
Training Gear...
If this is your first RC helicopter, you should really use a set of training gear. The scale landing struts on the Blade CX3 are not that wide and it is very easy to tip the helicopter over when first learning how to fly it. You can build your own which I show in my "How To Build RC Helicopter Training Gear eBook" .
Knowing When To Land
Here is a little trick I use when flying the Blade CX3 while trying to get every last second of flight time out of the battery pack without falling out of the sky when it dies, or worse damaging the Li-Po battery pack by over discharging it (which by the way is easy to do and destroys the Li-Po pack).
If you watch the green light on your 3-in-1 unit while you give added throttle, you will be able to detect when the battery is almost exhausted. The light will turn red when the 3 in 1 unit is being over worked and stressed. You can see this when the battery is freshly charged as well with a full throttle command, the green light will turn red - this is normal, but should not be prolonged.
As the battery voltage weakens during the fight, that red light will come on sooner and sooner closer to your hover position. If you are hovering and notice the green light changing to red with just a small increase in power, you don't have long to land - probably about 20 seconds or so until the bird falls out of the sky.
Skid Bumpers
You may have noticed in several of the photos on this page, I have small pieces of silicone fuel tubing on all four corners of my landing skids. These are called skid bumpers and help prevent the helicopter from sliding around on smooth surfaces such as hardwood or polished concrete. They also protect the landing skids from abrasions and give a little shock absorption in a less than perfect landing.
I just used some normal silicone fuel tubing - it fit perfectly on the Blade CX3 landing skids. I only recommend doing this once you have pretty much mastered landing your CX3. These things do grip well, and if you come in for a landing while moving, especially sideways, they will grip the ground and flip the heli over.
I hope these Blade CX3 tips help you out with your CX3 or any other micro coaxial heli and perhaps give you a little more insight on this wonderful scale coaxial RC helicopter and what makes it tick.


