Forward Flight &
Translational Lift
by John Salt

Welcome to training day 8...
Today you will learn about translational lift and apply that to forward flight.
You are going to be flying large fast circuits around your fixed position.
This is similar to day 7 , but today you will start out flying a slow circuit around your fixed position and gradually increase the size and speed of the circuit.
You 'll be flying a 100 foot or so diameter circuit (smaller diameter circuits naturally if you are practicing with a micro CP). The goal is to get flying fast enough that you will actually have to keep the helicopter banked slightly to
counter the centrifugal force pulling it outwards.
You will also be bringing your helicopter to a much higher altitude than in the past few days, any where from 10 to 30 feet.
Yup, if you make a mistake today, it will cost you.
I should mention that you should increase your collective pitch range from your beginner learning settings to a more conventional general flight pitch & throttle curve. Again, I cover all that in my Setup & Tips e-book .
You might want to increase your dual rate throw on your left and right roll rate cyclic as well so the roll cyclic controls are more responsive. Pitch cyclic dual rate is most likely ok where you have it set now, but if you want a bit more pitch control, feel free to increase it as well.
Translational Lift & Forward Flight Instructional Video
Translational Lift
You might have already experience translational lift during day’s 6 and 7 if you got your helicopter moving rather quickly or if it was windy during your hover exercises during day’s 3-5.
Basically translational lift is the extra lift produced when moving air is introduced to the rotor disc.
The rotor disc becomes more efficient with air moving past it and therefore produces more lift.
In the real helicopter world, this additional lift is called “effective translational lift” or ETL for short.
The amount of increased efficiency is directly related and proportional to the air velocity passing by the rotors.
Because effective translational lift is dependent on air speed, not ground speed, wind as well as helicopter speed will produce it.
For example, if you are hovering with the nose of your RC helicopter pointed into a 20 kph wind, the effective translational lift will be the same as if the helicopter was flying forward at 20 kph in no wind.
I used forward flight in the above example because that is what your lesson is all about today, but translational lift is produced just as much if you are flying the helicopter sideways or backwards, or if you have a crosswind or tail wind – any air movement past the rotor disc either by wind or helicopter movement in any direction will produce ETL.
This is why I stressed how important it was to learn to hover on a calm day without gusty winds. If the winds are gusty when you are hovering the effective translational lift will always be changing and your RC helicopter will be bouncing up and down.
When you are first learning to hover, you will likely not be able to react fast enough to control this constant changing of lift.
Just one more ETL example that I have to mention that could save your helicopter from a crash.
What do you think would happen if you are flying a circuit and are heading upwind into a 20 kph wind with your helicopter traveling at 20 kph ground speed?
Well you will have an effective translational lift equal to flying at 40 kph ground speed. Now as you turn down wind while maintaining that 20 kph ground speed what will that do to your ETL? Yup, it will be non existent (zero ETL) and your helicopter will drop.
Just remember this when you start flying fast circuits in higher winds – when you turn downwind, increase your throttle/collective as soon as you are turning downwind or you might not be able to recover from the loss of lift in time, especially if you have a heavy scale RC heli and are flying close to the ground – yes, I personally learned this lesson the hard way $$$.
I don’t want to dwell on translational lift any longer, but I had to mention it before you start into your forward flight excises so you understand why your helicopter behaves the way it does, and to prepare you for how the resultant lift will increase and decrease as you move in and out of translational lift.
Forward Flight Lesson
Before we get into our fast circle circuit, you are going to practice going in and out of translational lift. You have to be comfortable with the helicopter flying at a right angle to you (you looking at the left or right side of the helicopter) – days 6 and 7 have prepared you for this.
Pre-flight checks completed? Should be automatic by now right...
Start by hovering a few feet off the ground and turn the helicopter to the right or left so you are looking at the left or right side of it (which ever you feel more comfortable with). Now give a little forward cyclic to get it moving forward at about 5-10 kph (fast walking or jogging pace), then stop it and hold it at a hover when it is about 20-30 feet away from you. What happened? You should have noticed the helicopter gain altitude even though you didn’t increase the throttle/collective – you just experienced translational lift.
This is important to understand when you are flying fast circuits because as you transition into forward flight you will have to decrease your throttle/collective a little bit to maintain a constant altitude. The most important thing to remember is as you slow down and come out of translational lift back into a hover, you will have to add throttle/collective to maintain altitude. It will take practice and after a while you won’t even realize you are doing it.
All ready for your first fast forward flight circuit?
Good, just like I said in the opening paragraph, this will be just like our day 7 slow circle circuit, but this time instead of keeping the circle small and slow, you will be increasing the size of the circle, the altitude of the helicopter and the speed of the helicopter.
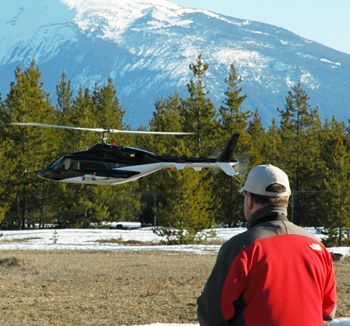
Start flying the RC helicopter slowly around you just like day 7’s exercise (most likely a counter clockwise circuit), now start increasing the size of the circle, altitude and the speed of the helicopter – not too fast or you will start getting dizzy. When you are first starting out, keep the circle about 50 feet in diameter and have the helicopter about 8-10 feet in the air. After a few circuits, start slowing the helicopter down and make the circle smaller until you are back to your day 7 circle circuit that you have practiced many times by now. Land the helicopter and take a rest.
How did it go? Did you feel comfortable or very nervous and scared? If you feel that way, no problem, just spend more time on day 7’ exercises. If you felt good, great – now try the same lager faster circuit in the opposite direction (most likely clockwise).
After you feel comfortable and confident with the 50 foot circle in both directions, time to make the circle even larger and faster with more altitude. Try a 75 foot diameter circle and then move up to a 100 foot diameter circle. The larger the circle, the faster you can fly with out getting dizzy and you should be getting the helicopter at least 20-30 feet high to avoid the ground sneaking up on you too quickly if you make some small mistakes.
Once you start flying faster in both circuit directions you will want to start banking the helicopter. This comes very naturally by giving a little left cyclic when flying counter clockwise circle circuits or right cyclic when flying clockwise circle circuits.
You will also find yourself pulling back on the cyclic slightly to help bring the helicopter around the banking turn. If you have flown RC airplanes before, this will feel very natural and is actually very much the same. Once the RC helicopter is flying fast circuits, it does behave similar to an RC airplane. This is called a coordinated turn.
If you run with a headling lock tail gyro (which most people are these days), you will also have to give some left or right tail rotor. Left tail rotor when banking turning left, right tail rotor when banking turning right. This is keep turning the nose of the helicopter into the direction of the turn.
If you run your tail gyro in rate mode, you'll find you don't have to give much if any tail rotor to keep the nose pointed in the direction of the turn because the helicopter will naturally "weathervane" in that direction. This is of course dependent on helicopter air speed and the size of your tail fin.
As you slow your circuit down and progressively make the circle smaller and tighter don’t forget you will have to increase the throttle/collective to make up for the reduced amount of translational lift. By the time you are at this stage, that correction will pretty much be automatic, and you probably will be doing it without even thinking about it.
Another successful day under your wings...
Today you actually got to see some of the performance potential of your helicopter and you are most likely starting to get really addicted to this hobby. Can’t wait to get flying again. Day 9 will be even more fun - ready?


