Roban Super Scale AS350 Helicopter Review
by John Salt - Last Updated September 2023
I've always wanted to do a larger scale AS350 helicopter build because the AS350 Eurocopter is one of my favorite full size helos.
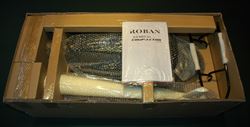
As luck would have it, I found a Roban Compactor 700 size Super Scale AS350 B3 on a good sale here in Canada and could not pass it by.

It was not exactly the color scheme I would have picked if I had a choice; but once it arrived and I started getting it all put together, I really started to like that black & cream with the copper and red pin-striping color scheme. This by the way is a real color scheme that was used by Wanaka Helicopters out of New Zealand.
 Wanaka's Color Scheme On An EC130
 Roban's Rendition On The AS350
For those in North America, you have
likely seen these 700 size Super Scale RC helicopter kits at Motion RC (the North American Roban dealer),
but they are manufactured overseas by a company called Roban Models. There
are several other Roban dealers throughout the world, so if you are
interested in them yet don't live in North America, it would not be a
bad idea to check for dealers that may be in your area to save a fair
amount on shipping and import fees.
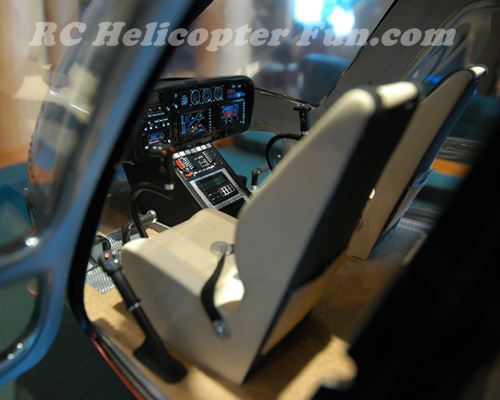
Roban 700 Super Scale AS350 Helicopter Interior
Doing
things a little backwards here, let's start out with the interior first
and get that out of the way. The "Super Scale" of course refers to the
full scale interior these helicopters are sporting. The detail is not
Vario Helicopter quality by any stretch, but if you put a little extra
time into it to "spruce" things up and add some more scale items, it
comes out looking not half bad.
 Scale AS350 Interior Extra's
Above for example are a few of the little extras I added to this scale AS350.
First off the entire instrument pod was shiny black and looked pretty bad so I dulled the exterior to matte black with a medium grit ScotchBright pad.
I also painted the bezels around the gauges silver and a few buttons to make them "pop" a little more and added an LED RX battery monitor (circled in green) to the radio stack.
I'm not
sure if I like it there, but it's super easy to see the monitor by just peaking inside the cockpit and it does add some LED & circuit board eye-candy to the cluster.
No
question, if you have the time, you could really make a nice and
detailed scale instrument cluster to put in this thing.
The instrument pod is made out of fiberglass so it would be easy to cut out the molded panel and install a highly detailed custom one with back-lit instruments, detailed buttons, CRT & LED monitor displays etc.
I actually just have my instrument pod bolted in from the bottom of the floor
so I can remove it should I ever decided to go the effort of making a customized cluster. Anyway,
at a distance the included instruments look pretty good; in other words
"good from far, but far from good" :-)
The
kit comes with two cyclic sticks, but no collective sticks or tail rotor pedals, so I had to make them as well. I also made a couple fire
extinguishers and made seat belts for all the seats.
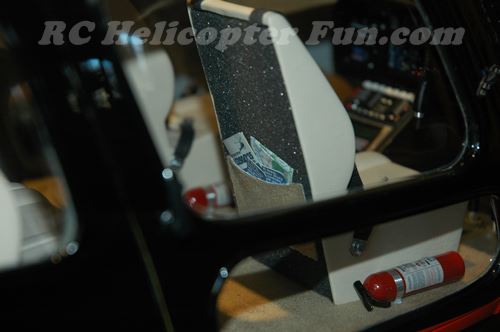
I added seat backs to
the two front seats and then made little pockets for maps and air
sickness bags etc. I finished off the interior by gluing down beige
carpet (faux suede fabric that my wife had left over from a sewing
project). These customized little details likely added another 30 hours
or so of time to the build but they didn't cost me a dime and were a fun escape from a traditional RC helicopter build. I can also continue to add little details here and there over the years - that's another thing I really enjoy with scale RC helicopter builds.
By the way, the glue they used around the windows was a
very ugly & noticeable yellow. So I also had to take all the doors
off and carefully paint matching grey around the windows to hide the
ugly glue. Speaking of doors, they all work. The left rear door is a
large sliding door along with a smaller swinging front door. The right
door is a single large swinging door. The handles & door hinges look good, work very well, and door fitment/alignment to the body is near perfect. Fitting working doors on scale helicopters is a true PIA, so it was super nice that fiddly and insanely time consuming step has already been done for us.
Yes, the interior is begging for a full body pilot at minimum but I'm having a hard time with that. The actual scale of this AS350 is 1:6.6 so it's kind of an odd ball scale. 1:7th is on the small side, and 1:6th is a little too big... There are some amazing full body scale pilots out there but they are not cheap. Most I have found are well over $100, and it's pretty hard to justify to the wife how a (somewhat) grown man wants to spend $150 bucks on a doll (even I can't believe I would ever do such a thing).
Oh well, the search for a "cheap" pilot continues. Barbie's teen sister Skipper may be a contender as she is close in size (about 9" tall). Yep, you get some pretty strange looks from people in the doll isle in the toy department when you are measuring all the dolls with a tape measure. By the way, if anyone has found a good size and not overly expensive pilot for Roban's 700 size AS350's, I would very much like to know :-)
July 2015 Scale Pilot Update
 GI Jane Scale Helicopter Pilot - A workable size.
 GI Jane Found on eBay
I have to thank a web visitor for letting me in on his 700 size Roban AS350 "Affordable Pilot" solution. As you can see, the GI Jane helicopter pilot is a good lower cost option.
You can find them in the $30-$40 dollar range on eBay.
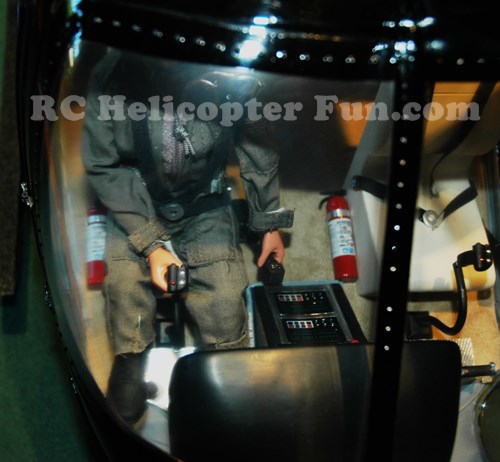
She is 11" tall - so slightly too big. I had to shorten her legs by about 1.5" so they would rest on the tail rotor pedals correctly and her torso is a little too tall as well. Once inside the heli however, you really can't notice her "newly shortened" legs so it's a workable solution. All the photos of her outside where taken before I performed leg surgery ;-)
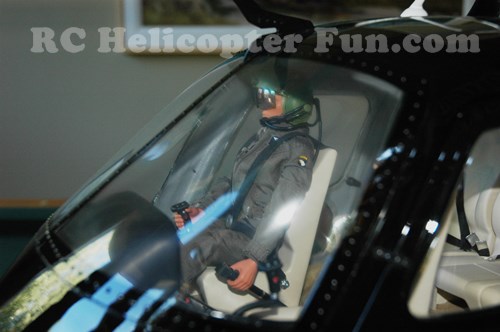 GI Jane's hands are flexible so they grip the cyclic & collective well. She sits too high in the seat however.
As seen above, her hands very realistically grip the control sticks. The plastic is quite soft so it's easy to bend her thumbs back a little bit to slide her hands over the sticks and then she grips them quite well.
I'm also very glad I glued my seats in from under the floor with hot glue instead of epoxy or CA. I could not have fit her without removing the front seat so with the help of the heat gun on the back side of the floor to soften the glue, the seat came out super easy for pilot fitment. I had to custom make another set of 4-point seat belts for her as well and again, seat removal made that a 10 minute job.
Next to being a little too big, GI Jane's single biggest draw back is her weight - she is a heavy weight! At about 180g, it's a lot of added weight to an already heavy heli.
 She definitly is a welcome addition to this scale build, and for only $30 - a no brainer!!
August 2021 Scale RC Pilot Update: I finally printed a 3D body to save weight, get a custom scale fit, and have a moving head. This dropped GI Jane's weight almost in half! Yep, I'm still puttering around on this bird 6 years later and it's still flying well.
Roban Super Scale AS350 Helicopter Unboxing & Mechanical Details
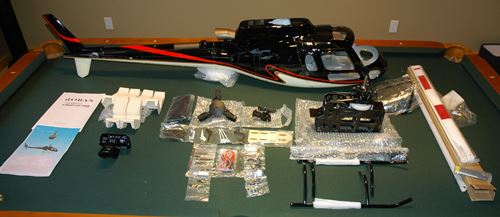
Out of box, the components in the kit spread out do take up a fair amount of real-estate.The fuselage is huge when you first look at it.
What is
likely the most impressive dimension on the Roban 700 super scale AS350
helicopter when you open the box is its width at 355mm. Pictures just
don't do that dimension justice.
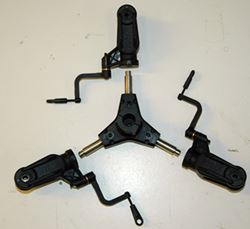
The
mechanics are of course custom designed for these 700 super scale
bodies. They use a belt drive from the motor pinion to a larger belt
gear, then one more stage of gear reduction to the main mast
gear very similar to SAB's Goblin's.
I could not find the final gear
ratio listed anywhere in the instructions which is a pretty important
specification to leave out! I had to manually do the calculation and it
worked out to 14:1. Tensioning the toothed drive belt is easy by way of a sliding motor mount, but it's hard to get to
the locking bolts afterwards. No you can't access them once the
mechanics are in the fuselage so it's best to test fly before hand (more
on that later)...
 700 Super Scale Mechanics - Yes, the Frame Is Angled Down Slightly When Installed In The Fuse.
As you can see, the tail
boom actually sits near the bottom of the mechanics so that is
certainly a different departure from what most of us are used to. The frames by the
way are made from 2mm G10 fiberglass and have nice clean cut lines and
are of good quality. The entire set of mechanics come all assembled but
nothing is tight for the simple reason you have to take it all apart to
properly build it. It's an interesting design and is of course perfectly
suited to these large scale bodies with most of the mechanics sitting
up high in the helicopter & doghouse, just like the full size
machines.
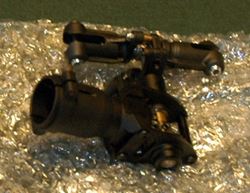
You would think
how big this thing is, there would be ample room, but the mechanical
layout is actually fairly tight, as much of it sits up in the dog house so it has to remain fairly skinny. This is most apparent when looking at the servo and control
linkages/bellcrank placement all being sandwiched between the frames as see in the photo below.
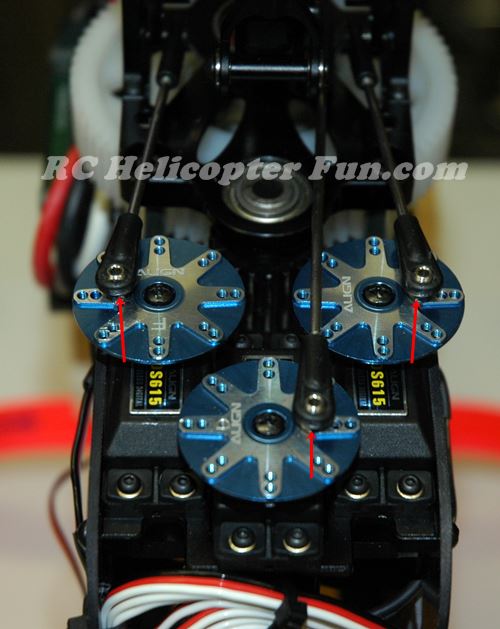 Customized Ball Link Placement On Servo Wheels To Reduce Mechanical Gain (Throw)
Notice the red arrows on all the servo wheels where the balls & links are mounted... I actually had to drill & tap those new locations for the balls. There is an excessive amount of mechanical gain due to the bell crank geometry from the servo pushrods up to the swashplate. I had to reduce that mechanical gain by moving the links in on the servo wheels because when I was configuring the flybarless system, I had to have overly low travel limit settings well outside the recommendations when they were mounted on the factory hole settings.
I figured this was a good compromise to the problem because it also means the servos won't experience as much load tension with the links closer in on the wheels. You can't see it well in the photo, but the
elevator arm doubles as the swashplate anti-rotation so no unsightly
anti-rotation bracket sticking like a sore thumb out the top of the dog
house.
Electronics Pairing
These
kits don't come with any electronics so you have to pair your own which
can blow the budget fairly quickly on a 12S powered 700 size helicopter. Even
though you are not going be flying a big heavy scale AS350 helicopter like this
that hard, you certainly don't want to cheap out on the electronics due
the already high cost of the kit and no doubt, it's a heavy bugger at over 20 lbs, so it will be pulling some high rotor loads regardless and the servos will be working hard.
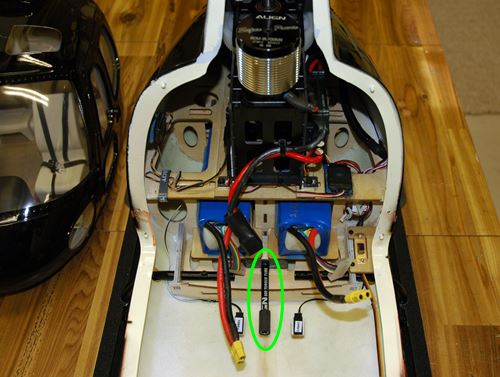
 Installing the "electronics" in the Roban AS350
I
didn't pile anything overly special in it, but I didn't go bottom line
either. Yes, I would have liked to put high voltage Futaba or Outrage brushless servos in
but I just didn't feel parting with $600 bucks for servos was necessary
so I stuck with decent bang for the buck coreless digital Align DS615's
on cyclic and a DS655 for the tail and they have been working great. I
already had a brand new Align 700MX 470 KV motor here I picked up at a
clearance sale a year or so ago so that was a no brainier, and I had a
brand new Castle HV ICE2 120 Amp ESC in the spares box as well.
All
that was left was the FBL unit and receiver. The FBL unit was really no
decision, I've been so happy with my Bavarian Demon 3X's so why mess
with what works. Lastly I had a spare Spektrum AR8000 in the parts box
so a little more money was saved there. I'm powering it all unregulated
off a 2S 3000 mAh LiFe pack for a bullet proof onboard power source.
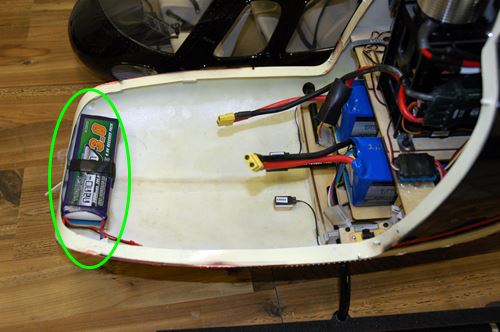
As you can
see in the above photo (circled in green), I've mounted that RX battery as far forward in the body to get the
CG somewhat in line. Like most scale builds, this thing is tail heavy
but I didn't have to use a single ounce of nose ballast.
All
in all, I only spent about $500USD for the electronics but if I would
have also had to get the motor, the ESC, and the receiver, the total
cost for electronics alone would have topped out at over $1000USD! No question,
electronics, even when you get fairly modest stuff adds up very fast on
any larger RC helicopter - not just scale.
The Rotor Head
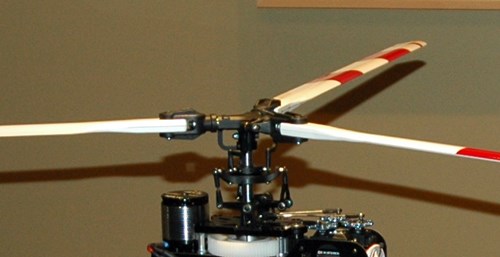
As some of you may know, I'm not a fan of multi-bladed heads due to the added BS, but there is no denying it looks great. The head uses solid axles so there is no dampening per se, but the blade grips are plastic and have a fair amount of flex as do the scale non-symmetrical rotor blades.
The head was all put together with thread locker, but two of the
blade grips were very tight & notchy feeling so I had to take them
off and investigate. The brass blade grip spacer washers on the two
grips were just a tad too thick and pre-loading the thrust bearings too
much. I had to wet stone them a tad thinner and that took care of over
pre-load issue.
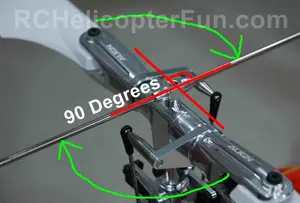
The really cool thing with this head as you can see are the interestingly shaped DFC arms.
I'm no stranger to phasing multi bladed heads, but there is no phasing to worry about with this head.
The arms are already shaped to
account for the 90 degree gyroscopic precession phase angle of each
blade in relation to the swashplate. If blade phasing was all that was
keeping you away from multi-blade before, no worries in that respect
here.

Getting back to those non-symmetrical scale blades, they are pretty decent looking and are full carbon blades. Balancing however is not great.
With my tri set of blades, two were perfectly balanced and the other was lighter by a fair amount (more than I would normally be happy with).
The only good thing is the one that was out was the light one so it was fairly easy to add some tape to it to bring it up to the other two. If it would have been the other way around, I would have had to add tape to the two balanced ones to bring them up to the heavy one.
In fact, this is
exactly what a friend of mine had to deal with on his Roban 700 Super
Scale Bell 429. He's also got 4 blades to balance and some of them are
out by the weight of a quarter - completely unacceptable! Roban has to
get this sorted out as I have read others with these same issues. In
fact, it almost seems so common, people see it as normal on these
models. Normal maybe, but certainly not acceptable when you are paying
this much money.
The Tail
At the back end, there is a standard aluminum torque tube driven open right angle gear box with standard pitch slider mechanism and plastic tail blade grips.
What is different however are the umbrella gears both in the tail box and up front in the frame are full metal and not nylon like seen on most modern day RC helicopters.
I'm not 100% sure why this is, but the tail is working hard
on this thing as I will talk about later so that is the likely reason I
think. I made sure to apply an adequate amount of high pressure grease
to these little metal umbrella gears both up front and in the back.
I
also had a sticking tail blade grip but this one was not due to bearing
preload. Whoever assembled it got a little carried away with the thread
locker and it had saturated the bearings so they were shot. Luckily
they use the same size tail blade grip bearings as most 600 & 700
size helicopters so I had spares on hand.
All
in all the build went fairly well and the instructions were adequate
for an experienced builder. That said, for the money these things cost,
there really should have been no such issues and I would have certainly
been more upset if I paid full retail for this kit and had the same
issues.
Roban 700 Super Scale AS350 Helicopter Fuselage
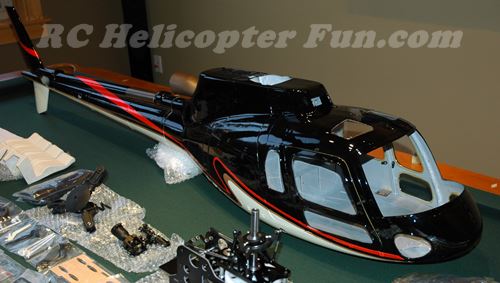
With the interior and mechanics out of the way let's "look" at the fuselage. I have to tell you, I was not overly impressed with the quality. The fiberglass work on the inside is pretty crude, the paint lines are not crisp & sharp, and the paint actually is fairly easily chipped. I have talked to others with Roban super scale helicopters and these are all common concerns.
Now I have to put all that in context. First off, the paint job/quality is at least an order of magnitude better than anything I could have pulled off (I'm a terrible painter). There are also plenty of worse pre-finished scale fuselages out there, but I'm comparing this to any of FunKey's fuselages.
I still can't get over just how good FunKey
does scale bodies. The firberglass is near art work, and the paint is
damn near automotive quality - not so with Roban.
 Roban Super Scale AS350 Rivet Detial
Of
course all the little rivets do add a lot to the overall impact and
from just a few feet away, you can't even see the little paint imperfections. All in all, not bad...
 Roban AS350 Mechanics Mounting Plywood All Ready In Place - Huge Time Saver!
Additionally nice as seen above, is all the plywood mounting spacers for mechanics attachment are all glued in place so there is no messing around with building custom spacing blocks
and taking several hours to perfectly align the mechanics inside the
fuselage. Just slide the mechanics in, a couple M3 bolts, and you're done! That alone is likely worth a few paint chips - LOL.
 Separate Tail Boom - Wiring & Lighting Has To Be Installed By Builder
The boom
is separate from the main body and that helps further in the mechanical
install. It takes about 15 minutes to fit the mechanics once you've done it a few times.
All
in all, the mechanics fit very well into the fuselage and were in near perfect alignment. I did have to grind the tail rotor opening in the
end of the tail boom a little lower with a Dremel sanding drum for
pushrod/linkage clearance, but that was about it for fitment headaches. Certainly a welcome departure from what I'm used to on most scale builds.
 Original Doughnut On The Left, Homemade Robust Doughnut On The Right
Oh, the foam dampening doughnut that fits around the metal tail boom inside the body's boom was more or less useless.
It was so thin and flimsy, the mechanical boom
inside was "floating" more than being dampened. So I had to get a piece
of thicker foam rubber and make my own dampening boom doughnut. Not as pretty, but it works a hell of a lot better!
The dog house
dampening foam blocks are also pretty flimsy, but they work and they do
make it a little easier to slide the mechanics in & out.
 Roban AS350 Clean Belly & Nice Scale Landing Struts & Skids (I built the bear paws out of carbon plate)
The landing struts/skids are very nice and mount super easy to the body with hardware already in place (basically a 2 minute job). The kit also comes with the scale AS350 helicopter step plates and they are fairly well done. Once you stick some anti-skid tape over them, they look almost like the real deal. The other little external scale items that come with the kit are not that great.
The paint basically peels off the
antenna's the first time you flex them, and the cable cutters are made
from a very soft and brittle material. It would be well worth a persons
while to trace them out and build a set from 2.0 or 2.5 mm carbon sheet or just 3D print your own IMO. The two
step bars on the front of the tail boom are decent and strong.
Lastly,
I really like how the entire scale interior section comes off the rest
of the fuselage as it makes LiPo battery access so fast and simple. The
interior section is held onto the body with very strong magnets. You
also have the option to screw the interior section on, but I have found
no need to as the magnets hold strong. Speaking of the batteries, both
slide on plywood plates into compartments under the mechanics in the
"bowels of the bird".
The instructions call for Velcro straps to hold both battery trays in place. This was a pain in the rear end I
found; so I just made a little plate out of carbon that keeps the trays
from sliding forward. I made a little easy to turn spindle (circled in green in the photo below) with an M3 bolt epoxied in the end to tighten this little anchor plate in place. This is working so much better than fiddling around with
straps.
 Roban AS350 Battery Mounting & Home Made Tray Lock
First Roban Scale AS350 Helicopter Test Flights
The one main concern I did have with this model, even before I got it was the fact it's more or less meant to be flown off the bench with the fuselage attached.
Anyone who knows me or has seen my scale RC
helicopter page knows I would never-ever put a scale body over brand new
untested mechanics. I figured I would have to break my cardinal rule
with this scale build, but then I realized there is no reason I had to risk the fuse. I
could just build a test platform for it which is exactly what I did.
 The "Flintstone Flyer" Test Bed
A friend of mine nick-named it the "Flintstone Flyer", and it's likely the ugliest thing I have ever flown in my life! Thing is, it was super easy to build and I was able to work out all the little bugs before subjecting the fuselage to the first wave of test flights.
 Roban Mechanics Flying Smooth As Glass On The Flintstone Flyer
I have to say, it flew very well off the bench with no real surprises - except one, the insanely long flight times. I was getting 14 minutes to a 75% discharged state. After downloading the ESC data, I could not believe how little current this thing was sipping. No question those three non-symmetrical rotor blades were responsible for some pretty efficient lift.
Head speed at this point was 1050 RPM and it seemed fine. A full power climb-out however would cause the tail to lose the torque battle of the huge drag created by the three bladed head. Even if I held in full right tail before jamming the collective, the heli would soon start pirouetting left.
The tail rotor is only a two
blade, so that might have something to with it when used in conjunction
with a 3 bladed head with all that added drag. This is where I feel
having those metal tail gears is a good idea as the tail is working
hard.
I dialed the head
speed up to 1100 to get the tail spinning faster and things got better; I
was still getting about 14 minutes taking the packs down to 80%. I
tried 1200 as well, and things got fairly lively, but not what I would
like in scale and the rotor noise wasn't as nice as it was at 1100.
Blade tracking was off a bit, but with three different colored tapes on
the tips, it was fairly easy to set. I had to tweak a few settings on
the Bavarian Demon, but other than that, the Flintstone Flyer was smooth
as glass just like any large RC helicopter.
Time to fit the fuselage...
 Roban 700 Super Scale AS350 First Spool Up With Fuselage
I initially set the 3 governed speeds in the Castle ICE2 to 1100 RPM, 1150 RPM, & 1200 RPM. Unfortunately, with all the extra weight of the fuselage, 1100 was just too slow. There was even more torque now off the main rotor hauling all that weight skyward and even a mild collective increase would induce a left yaw. 1150 was not much better. 1200 however is very acceptable I find.
Yes, if you perform an overly
aggressive climb-out, the tail may lose its battle, but if you fly true
scale style, it has no issues. So I reset my governed speeds to
1150,1200,1250. I mostly fly at 1200, but if I want to throw it around
just a little bit harder, I'll switch to 1250. One thing for sure is the
extra weight of the fuselage is certainly draining the LiPo's faster
now. At 1200 RPM, I'm getting a very safe 10 minutes going down to about
a 75% discharged state.
No
question, the tail is working hard on this Roban Super Scale AS350
helicopter and tail authority can be weak. We have all gotten so used to the insane amounts of tail authority on today's high performance electric sport & 3D helicopter's, so this one can catch you off guard if you are not managing your power & torque well. In the full size helicopter world, this is known as LTE (loss of tail rotor effectiveness) and the same precautions in the full size world to prevent LTE, have to be observed with this Roban.
I have upgraded the stock Roban symmetrical tail blades with asymmetrical tail blades and that helped with LTE a fair amount, but it's still something to be mindful of. In other words, don't fly this heli like you would fly your sport or 3D pod & boom birds.
How Does The Roban Compactor 700 Size Super Scale AS350 Helicopter Fly?
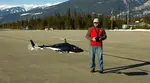
 Big 700 Super Scale AS350 Hovering Rock Solid!
I've been flying this scale AS350 helicopter now throughout the winter and into the spring and I can honestly say I'm super impressed. It looks and behaves so real and is just a pleasure to fly. It also sounds great and you can definitely hear blade thumping.
You do have to be careful with it however as it is a heavy bugger so rotor disc loading is high, meaning it's fairly easy to get caught in your downwash (vortex ring state in the full size world). If that happens close to the ground before you have the time to roll or pitch it into clean air, it could get really ugly, really fast!
It's also a bear to fly in the wind because of the vortex ring state tendencies along with the weak tail authority. It's a big fuselage as well with a large surface area so the wind can push it around. However in calm conditions it's a treat to fly and very predictable.
Final Roban 700 Super Scale AS350 Helicopter Thoughts
A few mechanical issues...
I've had to replace the tail rotor umbrella drive gears once as the metal on metal gear teeth with high tail rotor work loads wore the first set out quickly. The second set have lasted much longer and are showing little wear now that I religiously service them with high pressure molly lube grease every 10 flights or so.
I've also had to replace the main shaft bearings and tail shaft drive bearings, but I put in better ones and they too are now lasting.
The poor tail authority naturally rounds out the "mechanical misses" list but as already mentioned, has been improved by using semi-symmetrical tail blades to provide more counter torque thrust over the stock symmetrical tail blades.
Tail performance is likewise improved by learning to fly this thing properly and manage both main and tail rotor energy better. You know, just like you would have to when flying a full size helicopter. That is after all why we fly big scale is it not? :)
Other than that, I've had no mechanical hiccups at all (still on the same belt after 6 years), and have more or less forgot about the initial issues I had during the build.
Would I get another Roban 700 Super Scale RC helicopter? Most definitely YES!
 One of Roban's EC-130's using the same HSM Mechancis as the AS350.
I'm actually looking at getting one of their 800 super scale EC-130's now as I've always wanted a scale RC helicopter with a Fenestron tail rotor. Roban's EC-130 shares most of the same mechanical parts as their AS-350, so it would make lots of sense from a familiarity, maintenance & spare parts to stock standpoint.
Regardless of model, if you want a big scale RC helicopter with a full interior and don't want to pay double to triple for a Vario; Roban offers good value in that respect and there really is no denying just how great this thing looks and sounds in the air.
Paint and fibreglass quality are not near what FunKey offers, but FK don't have the rivet details or the scale interiors so it's somewhat six of one, half a dozen of the other depending on what you're after in a scale RC helicopter.
If Roban however could get their fiberglass and paint quality to approach FunKey's or FunKey could do a 700/800 size super scale - oh boy would they both be spectacular, jaw dropping machines!
I personally don't consider this super scale AS350 helicopter a good "first" scale build. I actually would have had fair amount of trouble with it if I hadn't already built some other large FunKey scale birds first.
 AS350 Tri Blade Folding For Storage & Transport - Nice!
That said, out of the many super scale helicopter models that Roban offers, the AS350 is definitely one of the easier ones to start with.
Battery access is super easy, there are no complicated angled tail
boom drives to deal with, there are only 3 main blades to contend with
along with a conventional two bladed tail, and it's fairly easy to put
together.
The other nice thing with having only three blades is you can still fold them all back into a blade holder and don't have to remove them for transport.
That personally has been one of the things I didn't care for with most multi bladed heads, so I was pretty happy when I realized I could still leave all the blades on as I heaved this heavyweight behemoth into the back of the vehicle.
 GI Jane Ensuring Blades Are Folded Back Out During Her Pre-Flight
Roban 700 Super Scale AS350 Helicopter Specifications
- Body Length: 1650mm (65")
- Length Including Rotors: 1920mm (75.5")
- Width: 355mm (14")
- Height: 480mm (19")
- Flying weight: Tipping close to & over 9.0kg / 20lbs.
- Main Rotor Diameter: 1560mm (61")
- Tail Blade Length: 105mm
- Main Shaft Diameter: 12mm
- Tail Shaft Diameter: 5mm
- Head Axle Diameter: 8mm
- Battery Compartment: 2X 60x60x180mm
To finish off of this Roban Super Scale AS350 helicopter review, here are two great full size AS350 Eurocopter videos. One warning however; after watching, you'll likely want to build a scale AS350 helicopter of your very own ;-) Enjoy!


Need Heli Help?
- Getting into the hobby but have no one to help you?
- Are you feeling overwhelmed & confused?
- Are you tired of wasting time seeking partial and conflicting information?
- Don't understand the maze of RC heli setup fundamentals?
- Is that sickening feeling after crashing turning you off the hobby?
- Are you simply ready to give up?
My RC Helicopter eBooks will help you with those exact problems. Grab your copies today.

Click Here For More Information

Click Here For More Information

Click Here For More Information
Recent Articles
-
Understanding Gyroscopic Precession In RC Helicopters
Mar 12, 26 05:15 PM
 What is Gyroscopic Precession and how will it affect phase lag in your heli controls - or does it?
 -
FunKey Fuselages Review - Outstanding Scale Helicopter Quality
Mar 11, 26 05:35 PM
 Funkey fuselages are some of the best quality fiberglass scale RC helicopter fuselages available. Let's find out why along with sizes & models available.
 -
Scale RC Helicopters - What You'll Need To Know & Best To Get.
Mar 10, 26 08:03 PM
 Scale RC helicopters - what skills you'll need, what's a good scale heli to start with, & much more.

