Blade 200 SRX Review
by
Jeff Norgate
This review is intended to cover my overall impressions of the Blade 200 SRX, to review technical glitches, and to offer some radio programming tips for the DX6i. It should be noted this information applies to the BNF version.
As you will see, the ability to program the radio makes this heli a better performer. One point before I get started, I recommend that you buy your helicopters, radios and other accessories from a reputable hobby store.
I am fortunate to have Flite Craft Hobbies, in Kitchener, Ontario, as my main supplier. The assistance and advice offered to me at Flite Craft has helped make this purchase much more enjoyable and their technical help has been well appreciated.
Blade 200 SRX BNF - What's Included?
 Blade 200 SRX BNF Unboxed
The Blade 200 SRX is a fixed pitch, single rotor, 200 size electric helicopter. It comes nicely packaged in a surprisingly small box.
It comes fully assembled with one battery, charger and adapter, a package of accessories including a screwdriver, an Allen key (don’t lose this), a bind plug, an instruction book, and some adhesive pads. There are extra swash links and canopy grommets in a separate bag. If you turn the bottom Styrofoam over, there’s an adapter for 220 volt service, so if you want to take your 200 SRX to Europe, you are good to go. I thought this was a nice touch, and likely a reflection of Blade’s worldwide market.
When the Blade 200 SRX was first produced, there was no support for the DX6i. Blade has since offered programming for this popular radio. You will find radio settings for the DX6i on their website, but you won’t find it in the instruction book. Most instruction books are light on details, and this one is no exception. There is a “bind plug” in the bag of goodies which isn’t mentioned in the instructions. I have looked at lots of information about this heli from lots of sources, and nowhere is this essential piece of equipment mentioned.
 Bind Port On Left Side Of RX
If you look at the receiver installed in the Blade 200SRX from the tail, you will see several sets of wires plugged in.
On the left side, there is a port which is unused; this is where the bind plug goes. When you are binding your SRX, you will need to plug the bind plug in there. Be sure to return your bind plug to the parts bag when you’re done. You’ll likely need it again.
One of the attractions of this helicopter is the availability of three flight modes and one panic mode. The panic idea might not be all that useful in the real world. In my experience, once a panic situation is reached, it’s already too late. The panic switch returns the heli to a level flight, but it will continue to fly in the direction it was heading, so unless there is nothing in its path, corrective measures will be needed, and once the panic mode is entered, most of the control is taken from the pilot. Simply returning the sticks to centre would achieve almost the same thing.
The three flight modes however, are extremely useful. A flick of a switch can change the way the helicopter responds to stick input, by allowing more or less pitch and roll. The beginner mode has the least pitch and roll, intermediate has more, and advanced has the most. In some ways, this takes the place of dual rates which can be set up on your radio. With your radio, you can tweak settings to suit your skill and flight situation, but with the pre-programmed flight modes, you take them as they are.
The radio settings provided by Blade for the DX6i, set the heli up as an airplane, in other words, in acro mode (all the radios listed by Blade for the 200 SRX are set up in acro mode). Once set up, the three flight modes, beginner, intermediate and experienced and the panic mode are all available. Panic mode is engaged when the Flap switch is set to position 1. Beginner mode with Gear and Mix at position 0, Intermediate mode with Gear at position 1 and Mix at 0, and Experienced with Gear and Mix both at position 1.
These mode settings are achieved by changing the maximum length of servo throws, and can be easily seen. Once you have your transmitter programmed and the helicopter bound, connect a fully charged battery and try this experiment before the canopy is attached.
Make sure the transmitter switches are at beginner position. Hold in full left or right cyclic and you’ll see the servo move with transmitter input. Be sure to leave the throttle at zero! Now, leave the cyclic control on full, and switch from beginner to intermediate, and you should see the servo move a little more, then switch to advanced, and the servo will move to its maximum throw. This can be repeated for the other servo. This is one way to be sure the transmitter is programmed correctly and the heli is responding properly.
 Blade 200 SRX 3S 800 mAh 30C LiPo
In the parts bag that came with the Blade 200 SRX are some adhesive pads.
I found placing one pad on the 3S 800mAh 30C battery, then pressing that against the battery support on the heli, helped secure the battery in place.
There is a Velcro strip on the heli to help secure the battery, and I like to tuck the charge plug in the Velcro loop when installing the battery so it is held securely. Be sure the battery doesn’t interfere with the operation of the elevator servo. Just leave enough space to make sure the servo can operate freely.
 Blade 200 SRX 3S 800 mAh LiPo Installed
Taking the canopy on and off is a lot easier without the rubber grommets in the canopy mounting holes. I have been flying the heli without them without any problem. I’m not fighting with the grommets to get them on and off and there is less strain on the canopy.
One more note before this bird is airborne. Even though there is a “beginner” mode, this heli would not be suitable for someone who has never flown an RC helicopter. Some people may be “naturals”, but most of us are not. I’m just starting my second year in the hobby.
Flying The Blade 200 SRX
I do most of my flying in my kitchen. It is fairly large and open, and mostly non-breakable.
When I first flew the Blade 200 SRX, I had no issues. It is responsive, and tends to travel in a straight line. Because it has no flybar, the response from stick input is clean and predictable.
One of the issues I had read about with this bird is that it feels heavy. I found this true, as I was well over half stick to put the 200 in the air.
I made a mental note of where my throttle stick was at lift off so I
could try to correct this problem later.
I landed the 200, and
switched on the intermediate mode. Once again, it lifted off, still at
two-thirds throttle, but now the stick response is quicker since the
aileron and elevator servos have increased travel.
It was still,
however, clean and predictable. After landing again, I switched to
advanced. Here’s where the heli shows some real aggression. It is quite
capable of fast response and greater speed. I landed the heli and went
back to beginner mode, which is more suited to indoor flying.
I
felt the Blade 200 SRX would suit the purposes I had in mind. I was looking for a
park flier large enough to operate in a light wind and still small
enough to fly in the house. I also like the idea of different flight
modes which offer different challenges, as my skill level improves. I
knew I wanted to change the programming on the DX6i so I could fine tune
the Blade 200 SRX, and in particular adjust the throttle so it is in the air
somewhere near half stick. My first plan, however, was to fly the heli
in acro mode for a few weeks, to see what other characteristics I might
want to fine tune.
I had been flying for less than two weeks when
out of the blue, the heli screamed forward, straight into a wall. At
first I wondered what I had done that was so stupid, then I looked for
damage. The canopy had a small crease in it, which is hardly noticeable.
I checked the stick response, and discovered the elevator servo wasn’t
working properly. I put this down as the cause of the crash.
Then
I first purchased the helicopter, I ordered some spare parts from
Horizon to have on hand. Fortunately a servo was part of that package. I
also ordered a spare battery, a spare tail motor and spare main gears. I
had read horror stories about tail motors, so I knew I wanted an extra.
I
kept the faulty servo, which was wise, installed the new one, and
happily flew for a few more days. The next issue also came out of the
blue, the heli spun around in mid-air and it managed to hit something
before I could land it. I figured this was the dreaded tail motor
issue.
I contacted Flite Craft in Kitchener, and they were very
helpful. They asked me to send them the servo and the tail motor. After
testing these parts, it was clear the servo was defective, but the tail
motor was still good! Flite Craft asked me to send the ESC. The ESC is
mounted under the helicopter, and it has a blue light when the heli is
bound and ready for flight. I sent the ESC and after testing, it was
faulty. Flite Craft was able to replace the ESC, and returned my
original tail motor.
I had taken careful note of the wiring
before anything was unplugged, so installation of the ESC was easy. A
word of advice about the ESC, check it after each flight to see how warm
it is. My new one is barely warm after each flight, and the tail motor
is the same. If you detect a lot of heat at the ESC, you could be in for
a replacement.
Blade 200 SRX Radio Programming
Once I had flown the Blade 200 SRX for a while in Acro
mode, I was ready to program the DX6i in Heli mode. The main reason for
this is to adjust the throttle curve to compensate for the “heavy” feel,
and try to get lift off around half stick, instead of two-thirds stick.
The
first thing I did was look at the monitor screen in Acro mode, to see
what each control was actually doing. Keep in mind, I still wanted to
switch between the three flight modes and have the panic mode available.
 Acro Selected
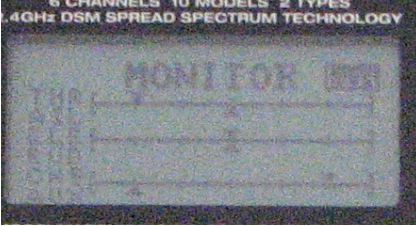 Monitor Screen
Above is what the screens look like on the DX6i, with the programming set up in Acro mode. Note the position of the AUX channel or channel 6. This is what the heli sees to control the panic mode. The extreme left side value, as shown here is normal flight, and the extreme right side value switches the heli to panic mode. Panic mode is turned on when the FLAP switch is at position 1. Once the radio is programmed in Heli mode, the AUX channel, or channel 6, is the Pitch control.
Channel 5 in Acro controls the three flight modes. The beginner mode is shown, with the value to the far right. Switching the Gear/Fl Mode switch from Gear to Fl Mode moves the value to the left, which is the intermediate flight mode, and the Mix/Th Hold switch to position 1, moves the channel 5 output further left, and puts the heli in advanced flight mode.
These channel outputs must be duplicated exactly, or the heli won’t respond properly. With this in mind, here are the DX6i settings I have developed for the Blade 200 SRX.
I decided to leave the settings for the Acro mode in my radio, until I was satisfied with the results in heli mode. Also, if I made a program error, I could still go back to the Acro set-up.
First, start a new model in your memory, and select “HELI”. I named this model 200 SRX*. I put the asterisk in place while I was building the new settings. I later removed it, once I had worked out the bugs.
Dual & Expo Rates: On the D/R Expo screen, I set each of the Aile, Elev and Rudd to position 0, 100 percent, and the expo at minus 25 percent. These dual rates improve the crispness of the response. I then set each of the Aile, Elev and Rudd to position 1, 100 percent, and the expo at plus 25 percent.
I have found the flight characteristics a little softer with the switches in position 1, and crisper in position 0. When these settings are combined with the three flight modes, it’s like having an intermediate step, between each flight mode. For example, intermediate mode, with the Ail and Rudd switches at position 1 the result is a less aggressive intermediate.
NOTE: As you will see shortly, the Elev switch will be used in the flight mode selection process, so you can only use this switch to soften response in beginner mode. Once intermediate or advanced modes are selected, the Elev switch is not available as a dual rate control.
Travel Adjust: Travel Adjust is set with each setting at 100 percent and sub trims are all set to zero.
In the Gyro screen, the switch is gyro, and the rate for 0 is 90 percent and for 1 is 30 percent. The Flap/Gyro switch, in position zero puts the heli in beginner mode, and in position 1, puts the heli in intermediate mode. The Elev switch MUST be in position 0 in order to put the heli in intermediate mode. If the Elev switch is in position 1, moving the Flap/Gyro switch to 1 puts the heli in advanced mode.
Throttle curve: Here’s where I did a lot of experimenting, but I like the result. The goal here is to get the heli off the ground around half throttle, and have finer control once the 200 is in the air. In the Normal mode,(Gear/F Mode switch in the 0 position), the L position, 7%, position 2, 40%, position 3, 75%, position 4, 90%, and position 5, 100%.
I was a little surprised by this, not expecting to start at the L position at anything but zero! My heli performs very well with these settings, and I still have to move the stick up to begin spooling up. At position 3, half stick, you are at 75%, and my heli is just nicely lifting off. There is some nice fine control in the air after that. Keep in mind when landing, power drops off quickly. The stunt position, (Gear/F Mode switch in the 1 position) I have a straight line. L=0%, 2=25%, 3=50%, 4=75% and 5=100%. So far I have only used the stunt settings as a reference. This would be the setting in Acro mode, with Blade’s radio set-up. Switching back and forth shows how much better the heli is with the switch in the 0 position.
Pitch Curve: This is channel 6, and must be used to switch on and off the panic mode. Since this is a fixed pitch heli, this channel isn’t needed to control the pitch. In both Norm and Stunt modes, and in each position, L,2,3,4and 5, set the pitch to 100%. The Mix/Th Hold switch will be used to turn the panic on and off. This is why the pitch has to be a straight line at 100%, so no matter where the throttle is, the pitch is at 100%. The Mix/Th Hold switch will put the heli in panic mode, regardless of the throttle position.
Remainder of Settings:
- Set the Swash Mix to Inhibit.
- Mix 1. Gyro to Gyro Act, Rate D+100% U 0%, Sw Ele D/R, Trim Inn. This is where the Elev D/R switch becomes involved in the selection of flight modes. It is true, different switches could be used, but I reasoned the Elevator is one control I am willing to give up in order to have the Aileron and the Rudder dual rates available, regardless of the flight mode.
- Mix 2 Inhibit.
- Revo Mix, all set to zero percent in both Norm and Stunt modes.
- Reverse is N for all positions.
- Swash type is 1 Servo 90 degrees.
- Throttle cut Position Inhibit. This means there is no throttle cut position with these settings.
- D/R Combi Switch Inhibit.
- Timer set to Down 8 minutes switch – trainer. I have found an 8 minute flight time is easily achievable. I have set to 8 minutes to be on the safe side.
- Range Check Inhibit.
- Power Setting B-US 247
- Contrast 44 %
With these settings, the Mix/Throttle hold switch activates the panic mode. Position 0 is normal, position 1 is panic. The Flap/Gyro in the 0 position is beginner mode. The Elev D/R switch can be used for dual rate in this mode only. Flap/Gyro in 1 position and Elev D/R in position 0 is intermediate, Flap/Gyro and Elev D/R both in position 1 is experienced mode.
Blade 200 SRX Power Gain Adjustment
Want more power out of your 200 SRX? The video blow goes over the procedure.
I am looking forward to a long future
with this helicopter. I enjoy the radio settings as I believe the
performance is improved. The Blade 200 SRX gives me a machine I can take
outside, fly inside, and can grow with me as my skills change.
The
technical glitches aside, I think I’ll be flying this bird for a long
time. I recommend this helicopter as a worthy addition to your
hangar...
Jeff Norgate


Need Heli Help?
- Getting into the hobby but have no one to help you?
- Are you feeling overwhelmed & confused?
- Are you tired of wasting time seeking partial and conflicting information?
- Don't understand the maze of RC heli setup fundamentals?
- Is that sickening feeling after crashing turning you off the hobby?
- Are you simply ready to give up?
My RC Helicopter eBooks will help you with those exact problems. Grab your copies today.

Click Here For More Information

Click Here For More Information

Click Here For More Information
Recent Articles
-
The Ultimate RC Helicopter Tools Guide: What You Need & Why
Apr 10, 26 12:56 PM
 A complete breakdown of RC helicopter tools. Let's cover swashplate levelers, pitch gauges, hex drivers and much more to help you achieve a pro-level build.
 -
Best RC Battery Charger Guide: How to Choose the Right One
Apr 07, 26 02:29 PM
 Confused by Amps and Watts? Learn how to choose the best RC battery charger with this guide covering features, power, ratings, safety and much more.
 -
RC Power Supply Guide: Don't Starve Your RC Charger
Mar 31, 26 06:33 PM
 From low cost converted server power supplies to commercial grade options, let's find the best RC power supply for your specific RC battery charger.