Havoc Helicopter Controller Modification
by John Salt
The havoc helicopter controller modification I have illustrated here will work on Havoc / Spinmaster and other type Toy Helicopters with infra-red controllers.
This includes the Havoc, Picco Z, Pixie, Venom Micro Rescue, etc.
Havoc Helicopter Throttle Stick Modification
This modification is actually done to the IR controller to make it more like a real RC helicopter radio. The reason you might want to perform this modification is to give more precise and relaxed throttle control of your havoc helicopter.
The throttle stick on all havoc helicopter type IR controllers is spring loaded to always return the throttle to the off position and hold it there. This is a good safety feature and really should not be tampered with. It does however make the heli a little harder to fly.
The throttle stick on hobby grade RC helicopter and plane radios is not spring loaded. It can be set in any position and left in that position. This allows much better control of throttle response.
The modification I am going to outline here should never be done on a child’s toy heli. It is intended for those of us who want more realistic RC helicopter throttle controls. If you are not comfortable opening up the controller and being able to put it back correctly – DON’T DO THIS MODIFICATION! I will not be held responsible for butter fingers and broken controllers.
- Remove the battery cover and batteries
- Remove the four small Phillips head screws in each corner on the back of the controller.
 Unscrewing The 4 Phillips Screws On The Back Of The IR Controller
- The front half of the havoc helicopter or similar IR controller is held in place by 4 plastic tabs on the sides. Carefully pry one side open with a small flat bladed screw driver. Once you get one side open, the other side will be easy to snap apart.
 Back Of Controller Snapped Open
- The havoc helicopter tail rotor trim button will most likely fall out as soon as you separate the controller halves – don’t loose it. Also don’t pull the front cover off with all your might... it is attached to the circuit board with a few wires.
 Controller Fully Opened With Loose Rudder Trim Button Shown On The Right
- Once you have the cover removed. You have two options to eliminate the spring on the throttle stick. You can simply cut one end of the spring off or remove it. If you cut it, it is gone for good. If you remove it, you can replace it if you wish. After flying your havoc heli with out a sprung throttle stick, I don’t think you will ever want it back on, so feel free to cut it – removing it takes some finesse. I will however show how to remove it. Certainly a lot less difficult than building a hobby grade RC helicopter.
- To remove the spring on the throttle control stick; you must first remove the throttle control pod. Simply remove the two Phillips head screws on either side of the pod and pull it strait out. It is attached to the circuit board with a ribbon cable, but there is a sufficient length of cable to easily work with the pod.
") Unscrewing Throttle Pod (also called the throttle gimbal)
Unscrewing Throttle Pod (also called the throttle gimbal) Throttle Pod/Gimbal Removed From Controller
- Once you have the pod/gimbal loose, remove the center screw that holds the two pod halves together. Now gently separate the pod in half. There is a little black friction washer on the pod pivot shaft – don’t loose it.
 Taking The Throttle Pod/Gimbal Appart
 Throttle Pod Separated
- The spring will either still be on the pod shaft or on the other half of the pod body, simply remove it with tweezers and save it if you think you might ever want to replace it. There will be sufficient friction remaining in the throttle pod for smooth control with out the spring in place.
 Removing Centering Spring From Throttle Stick
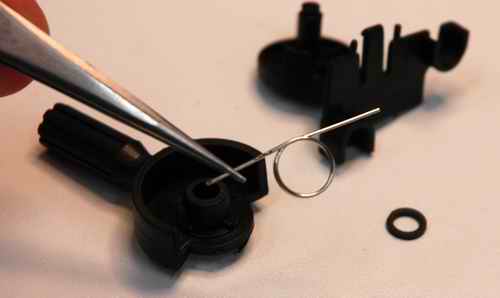
- Reverse the above procedures and reassemble the pod (don’t forget that little black friction washer).
 Throttle Stick Halves Pressed Back Together - Don't Forget The Black Spacer
- Refit the pod in the controller carefully tucking the ribbon cable back under the circuit board.
- Place the tail rotor trim switch back on the circuit board. Carefully snap the two halves of the controller back together making sure not to pinch any wires.
 Time To Snap The Controller Halves Back Together
- Replace the four screws on the back, the batteries and battery cover.
 Havoc Helicopter Controller Mod Completed - Save The Throttle Spring If You Wish
- Go for a test flight and see how much better your fine throttle / lift control is now on your havoc helicopter.


Need Heli Help?
- Getting into the hobby but have no one to help you?
- Are you feeling overwhelmed & confused?
- Are you tired of wasting time seeking partial and conflicting information?
- Don't understand the maze of RC heli setup fundamentals?
- Is that sickening feeling after crashing turning you off the hobby?
- Are you simply ready to give up?
My RC Helicopter eBooks will help you with those exact problems. Grab your copies today.

Click Here For More Information

Click Here For More Information

Click Here For More Information
Recent Articles
-
RC Helicopter e Books To Help You Succeed In The Hobby
Dec 18, 25 08:05 PM
 New to the hobby? Self learning & need help? Frustrated? These RC helicopter e Books will help, while cutting your learning time down substantially.
 -
Toy Helicopters - Which offer the best value & fun in 2026?
Nov 25, 25 06:23 PM
 With so many toy helicopters on the market in 2026, which are worth your time and money? Here are my top recommendations.
 -
RC Helicopter For Kids & Beginners - Making An Informed Purchase
Nov 25, 25 06:19 PM
 How To Choose The Best RC Helicopter For Kids & Beginners in 2026