XK K123 Micro Scale AS350 Review
by John Salt - Last Updated April 2026
The XK K123 micro scale AS350 RC helicopter remains one of the best micro scale helis I've flown to date.

The attention to scale detail on this little 6 channel micro collective pitch heli is amazing as is the low price of around $140.00 USD for the ready to fly version.
I admit to being a fairly big fan of all of KX's micro collective pitch helicopters. From their entry level K100, mid level K110 & K120, to their performance K130, and of course their two scale offerings - the K123 & K124.
All six offer up good design, low parts count, proper rotary servos, a decent flight stabilization system, great bang for the buck, and best feature of all - they are all Futaba S-FHSS protocol compatible. FTR (Futaba Transmitter Ready).
XK's line of micro collective pitch RC helicopters are now being carried by more and more hobby shops and there is no question, they are every bit as good, better in fact than Blade's offerings in the same size segments. Better pricing (heli & parts), more robust design in my opinion, and all the ready to fly versions come with a proper computerized radio.
 XK Heli Line: K100, K110, K120, K130, K123, K124
As a scale guy, obviously I love the fact XK offers two scale helicopters in their lineup. I just hope more are on the way... More on that later.
XK K123 RTF & BNF Options
The first thing you notice with all of XK's micro helis is the nice packaging presentation. A vague feeling of opening a SAB Goblin kit in fact due to the black box and sharp graphics.
 XK K123 BNF Kit
When Banggood offered to send me the XK K123 to try out, I jumped at the opportunity. I chose the bind and fly (BNF) version to use with my FrSky Horus radio along with the iRangeX IRX4+ multi protocol module I recently got for it. A perfect test for it along with the heli.
 XK K123 Bound To FrSky Horus X12S
Binding the K123 to my FrSky Horus radio was easy, however I did have to play around with the RF frequency fine tune value.
I ended up with a setting of +60 on my particular K123 and iRangeX pairing.
The video below goes over my full video review of the XK K123, along with the RF tune process if you are interested in what that's all about.
Of course, you can also get the ready to fly (RTF) version for not all that much more money.

It comes with KX's decent little 6 channel X6 computerized radio (transmitter) which of course uses S-FHSS 2.4 GHz spread spectrum protocol. Being computerized, it allows you to properly setup your KX helicopters (10 model memory) and alter important settings such as pitch and throttle curves along with dual and exponential rates to cater the heli to your personal skill level and flying style. The X6 supports both mode 1 & 2 stick layout.
") XK K6 Radio/Transmitter (TX)
XK K6 Radio/Transmitter (TX)The KX X6 isn't a high end radio by any stretch of the imagination.
The menu access on the X6 is not overly intuitive. There are no graphical representations of the pitch & throttle curves nor a channel output monitor screen to confirm your setup.
It does the job when you are first starting out, and is adequate for micro collective pitch heli flying.
You can always upgrade to a better quality Futaba computerized radio, or one of the growing number of multi-protocol computerized radios that offer S-FHSS protocol such as Jumper, RadioMaster or some FrSky models later on.
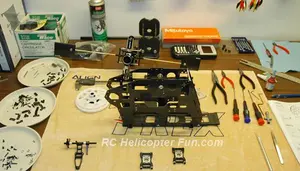
KX K123 Design & Components
As I already mentioned, the scale detail on this little heli is amazing and something that photos or video can't fully capture. You really have to see this little micro with your own eyes and up close to appreciate all that's going on.
 XK K123 Scale Details Are Amazing
From rivets to hinges & latches; door handles to wiper blades & raised window lips. XK really did spend time on these details. Of course there are molding and seam lines here and there that could use more refinement, but we must remember, this is a low cost, mass produced micro heli.
The fuselage is made out of a rather rigid, low density plastic, and like all scale RC helicopters, many of the scale details are fragile such as the horizontal stabilizers and boom mounted VOR antennas.
 XK K123 Window Detail
All the window panels are very dark tinted polycarbonate; so dark in fact, I thought at first they were just black gloss paint on the exterior of the fuselage until I looked closer.
Nice to see them all being held in place by plastic pegs instead of haphazardly applied glue or tape.
The dark windows are transparent enough however to be able to see the small blue & red SMD LED's on the control board.
This is handy for 3D & 6G gyro calibration since the LED's will flash to confirm you have entered the right mode of calibration.
The landing struts are strong and springy making them quite forgiving to less than perfect landings. With that said, unlike pod and boom micro helis of this size and weight, the XK K123 won't take much abuse. It's best for scale flying if you want it to stay looking new. Save the inverted grass mowing for your pod and boom XK's. The flat paint on the K123 is easily marked, but while flying, you don't get glare off of it.
If you do manage to damage the fuselage however, they make it easy to remove and replace. 3 tiny phillips head screws on the right side, 3 on the left, 2 on the landing struts, pull the tail rotor plug out of the control board, remove the carbon spacer rod, and the mechanics slide out the front. Replacement cost for the entire fuselage is reasonable at around $20 beans ($9 front section and $11 rear section).
 XK K123 Mechanics Out
The mechanics inside are typical XK. Three micro rotary servos instead of linear, arranged in a 120 eCCPM format with the aileron and pitch servo behind the mast and elevator in-front. Servo gear sets are available separately for a few bucks if you ever strip out a gear during a crash.
 XK K123 Mechanical & Electronic Component Layout - Elegant, Simple & Functional.
 XK K123 Brushless Motor
The powerful 1106 11000KV brushless out-runner motor is offset to the left side on the lower mounting plate and is driving the main gear underneath.
The main gear is attached to a robust and proper 2.5mm diameter stainless steel main shaft by way of a small through hole screw.
The mast is supported by upper and lower frame radial bearings well supported in the one piece plastic frame structure. A small metal collar with a through hole screw correctly and securely locates the main shaft in position.
Their is no metal or carbon boom down to the tail rotor; the fuselage itself is the structural boom member.
 XK K123 Rotor Head Assembly
The head block is CNC aluminum while the three blade grips are plastic.
The blade grips drive the upper half of the swashplate DFC style with tiny washout arms that correctly phase the swash to the head.
The swashplate anti-rotation bracket is located behind the swash and hidden from view as to not distract from the overall scale appearance.
Everything from the servos up to the blade grips are smooth with little free-play or linkage slop. After a couple dozen flights so far on my K123, nothing appears to be loosening up.
 K123's Large Diameter Fixed Pitch, Direct Drive Tail Rotor
The somewhat over-sized 55.5mm dia. tail rotor is direct driven from an 8502 coreless brushed motor.
Reactive torque loads from the 3 blades over a standard 2 blade head are high, so the little tail motor is working quite hard spinning that big tail blade.
The tail motor in my opinion is the weakest link in the power system and likely a good spare part to have on hand.
 XK K123 Control Board
The brains of the K123 are all contained within the 4 in 1 (receiver, FBL unit, tail motor mixer & servo bus) multi function control board.
The board is adhered to the upper plate of the frame assembly with very soft vibration absorbing foam above the battery holder and is fairly well protected.
The component layout on the board is logical with proper plugs for the servos, tail motor, and ESC making component changes a breeze.
The small tactile bind button is centered on the top left side of the board making it easy to push for binding.
There is also the provision (picoblade plug socket) located beside the tail motor socket on the control board for adding an LED light/s to your K123. The voltage output from this socket is conditioned to run a white LED (3-4V forward voltage), but you can run other lower forward voltage LED colors with the addition of a current limiting resistor.
The video below shows how I added a tail and belly light to my XK K123.
 XK K123 Brushless ESC
A separate brushless ESC is located under the battery compartment.
A 2 pin MX 2.0 2P connector is used for the 500 mAh 1S LiPo battery connection direct to the ESC.
The ESC then sends power to the main control board through the 3 conductor power and signal harness.
A standard 3 pin servo plug is used to connect the ESC to the brushless motor wiring.
 Bottom View Of XK K123 Frame Assembly With Main & Pinion Gear & ESC
Battery changes are fairly easy as the entire front nose section of the fuselage separates from the main body giving ample access. The front half of the fuse is held to the rear by 4 tiny rare earth magnets that line up to 4 more magnets in the rear half of the fuse.
I found it a little tricky at first lining the front section of the fuselage up when sliding it back into position; but after some practice and knowing what needs to slide over/into what during fitting, it becomes easier.
Battery size is rather critical as space withing the battery compartment is limited. The 1S battery that comes with the XK K123 is about 34mm long, 25mm wide, and 8mm thick. You could go a few millimeters longer, but the front of the canopy is already close .

The 1S LiPo battery that ships with the K123 states a capacity of 500 mAh despite large variations in capacity listed on XK and other's websites where you'll find 250 mAh up to 700 mAh numbers listed. I found the 500 mAh rating on the battery I got to be rather ambitious. While performing a couple discharge/charge cycles with one of my computerized chargers, the best I was getting was closer to 450mAh.
 K123 2 Port USB Charger
The battery charger that comes with the XK K123 is a typical USB powered charger that most of us are intimately familiar with now.
It does have two charging ports to charge two packs at a time, which is a nice feature.
You really need at minimum two batteries to have any amount of fun as flight times are short.
Charging time naturally varies dependent on how low you discharge your battery during a flight, but I was seeing just under an hour for an 80% discharge pack.
The XK K123 comes with a decent assortment of spare parts including a full set of spare main rotor blades (6 blades in total), a spare tail rotor blade, and a spare main gear. A small Phillips screwdriver and 1.5mm hex key are also included. Included instructions are the usual poor translated variety that offers little useful information.
Out Of Box Mechanical Setup Was Spot On
As shown in the review video I did, the mechanical setup was pretty much perfect out of the box. All the servo arms were level at their center position (1500 us), the swashplate was level, and the blades were producing zero degrees of collective with a symmetrical collective range.
Those that know me, know I'm border line OCD when it comes to swashplate setup, and I've never experienced any BNF micro collective pitch RC helicopter that is pretty much perfect out of the box like this one was. Anecdotal, but others who have contacted me relay similar spot on, out of box mechanical setups on their KX helicopters as well.
Radio setup was fairly easy. As I mentioned, all channel centering positions were set at 1500us and that gave spot on servo centering. Channel mapping is typical Futaba.
- Channel 1 = Aileron
- Channel 2 = Elevator
- Channel 3 = Throttle
- Channel 4 = Rudder
- Channel 5 = Stabilization Type Selection (3D or 6G Self Level)
- Channel 6 = Aux 1 Collective Pitch
I had to reduce the channel travel outputs however from 100%. Aileron and elevator were both reduced to 80% as to not over travel cyclic. Throttle, rudder, and CH5 to 90%. CH6 collective pitch had to be reduced down to 60% to get a +/- 10 degree collective range with a linear 0% to 100% pitch curve.
This little heli is spinning 3 blades and that uses up lots of power. Being only 1S powered, the little brushless motor simply gets bogged down with higher collective ranges. After experimenting with various levels of collective, +/- 10 degrees seemed the maximum it could handle both from a power aspect, and to limit torque induced tail blowout. Lots of reactive torque created off those three blades which is a good segue into how this little rascal flies.
I did have to re-calibrate the accelerometers (6G mode) due to a hard right and forward drift when switching from 3D into 6G self-leveling mode. The instructions were inaccurate in this process stating to be in 3D mode while getting a red flashing LED. I needed to be in 6G mode and got the blue LED flashing. Process is simple enough. While in that calibration mode, take off and hover dead still for a dozen or so seconds while the stabilization systems "re-learns" the correct hover position. Land and exit calibration mode - done!

XK K123 Operation & Flight Characteristics
I'll admit I don't particularly enjoy how any micro sized RC helicopter behaves compared to larger helis that have more mass and inertia giving predictable and fluid response.

The K123 is no different and can be quite squirrely and overly reactive like every other micro collective pitch micro heli out there. High dual rates, a good deal of positive exponential (negative for Futaba), or a combination of both will help substantially if you are after a scale type flying experience.
3D6G is XK's marketing terminology for their two levels of flight stabilization and as previously mentioned, are selected by CH 5. 3D selection as the name suggests utilizes standard 3 gyro flybarless stabilization and what I personally like flying with since I can't stand artificial feeling self leveling; I've been flying RC helicopters for over 30 years after all.
6G (good old 6 axis gryo misnomer marketeering nonsense aside) stabilization mode uses the full on auto level help combining the 3 gyros with 3 accelerometers. This mode gives artificial feeling cyclic self leveling help along with pitch and roll angle limits preventing you from getting into too much trouble. Even with the 6G mode turned on however, this is a reactive little heli and using dual and expo rates to your advantage will further help tame cyclic and tail rotor response down.
No question, most beginners who are new to collective pitch will like the extra stabilization help in 6G mode; but with the right settings, 3D mode can be almost as manageable, less the self level characteristics.
One last thing of note about the two stabilizaton modes. Unlike most micro helicopters, there is no LED visual indicator on the control board showing which mode you have turned on.
Of course, it's fairly easy to tell which mode of stabilization is selected on an RC helicopter by looking at the swashplate behavior as you move the heli around while holding it. Swash drifts back to level in 3D mode when the heli is tilted off level. Swash stays tilted hard over in the opposite direction in 6G when the heli is tilted off level.
Now to the fun...
Regardless of which stabilization mode you are using, flying the XK K123 is both fun and enjoyable. As a scale flier, I love the look of it up in the air and the white with red color scheme along with the high contrasting black windows make it really easy to see and track for such a small sized RC helicopter - even with my 50+ year old eyeballs.
 The K123 is easy to see, even on dull overcast days.
This 120 size heli makes an ideal yard flier and that makes it super convenient to get a flight in any time you want.
The K123 also falls well below the 250 gram RC registration weight limit that transport Canukistan has implemented; so if you live in Canada or any other country that has similar overreaching and ridiculous limits; you can fly the little K123 with one hand, while giving the middle finger to the government with the other.
The K123 flies very smoothly and can even handle a fair breeze. I haven't experienced any strange wobbles, bobbles, or porpoising while flying slow or fast in calm conditions. Wind or small gusts will buffet it around substantially while flying at speed like any micro sized RC helicopter.
While hovering, there are times the little XK K123 experiences some minor "nervousness", but it never lasts that long and is transitional in nature. Likely some sort of short lived resonance swamping the gyros but that is just a guess going by the nature of the behavior.
It tracks well in flight and has a predictable feel when flown scale style. Tail hold is surprisingly good for a fixed pitch direct drive coreless driven tail rotor. Not as good as a direct drive brushless tail motor when pushed hard. Tail blowout is fairly easy to initiate with large collective demands, or naturally abrupt head speed reductions where reactive torque is suddenly reduced.
Due to the large amount of torque from the main rotor, the tail rotor is producing a good deal of thrust to counter it in relation to the weight of the helicopter. This is generating considerable left tail rotor translating tendency (LTRTT), causing the little XK K123 to lean noticeably to the right to maintain hover equilibrium. All helicopters naturally lean to counter TRTT, but it's very exaggerated on the K123.
 XK K123 Heavy Right Lean From LTRTT
During flight, this exaggerated lean causes a fairly noticeable imbalance between coordinated banking turns. You'll find right banking turns almost effortless and natural to initiate and maintain; while left banking turns require considerable more cyclic input and are harder to maintain due to the opposing tail thrust fighting against the bank angle.
Being 1S powered and heavy (81g), along with the extra power needed to spin three blades doesn't make the XK K123 a great aerobatic performer. Managing your collective and even cyclic energy is the order of the day while flying it aggressively. As I mentioned, large collective demands often result in tail blowout, especially when combined with aggressive cyclic.
While flying any type of aerobatics, even light sport, you can hear the tail rotor working its guts out with every main rotor torque spike that occurs. Running flat line throttle curves to keep rotor speed fluctuations to a minimum helps naturally, but those three blades have lots of drag so pitch angle changes alone will cause large amounts of reactive torque changes.
Flight times will vary wildly depending on how hard you fly. Flown scale style with lower head speeds, I'm able to get 5 minutes but that is taking the LiPo down pretty low past an 80% discharged state. I have my timer set for 4:30 minutes and for scale flying with my particular setup, that seems safe.
For aerobatic flight running a 100% flat line throttle curve, don't expect much more than 2:30 minutes. 2 minutes if you want to be kind to the LiPo. Having extra LiPo packs is pretty much a must with the XK K123, just as it is with any electric powered RC helicopter. Getting a sub 5 minute flight and then having to wait an hour for the battery to recharge goes beyond frustrating.
Final Thoughts
For scale flying, the XK K123 is more than powerful enough and offers a very enjoyable, stress free flight. If you want to fly sporty acro, best to get out your pod and boom collective pitch micro instead. If you want to fly harder 3D, don't even consider the K123; it's too heavy and too under-powered - plain and simple.
 K123 same size & weight as a Trex 150X, yet the 150X is 2S powered & only swinging 2 blades making it the superior performer for aerobatics.
Since the K123 is such a heavy weight 1S powered micro, save your money and don't throw a single heavy upgraded aluminum part on this little rascal. You will only add to the problem and besides, it flies very well without any upgrades.
This brings us to my main complaint about this little heli - why on earth put a tri-blade head on an already heavy and lower 1S powered micro heli?
That extra blade is shortening flight time, sucking more power, creating more reactive torque, and adding unwanted weight. The efficiency loss is simply not worth the improved static looks. While flying after all, your eyes can't tell if there are two blades, three, four or more. The rotor is an opaque disc regardless.
I really hope XK comes out with some two bladed scale helicopters with the same attention to detail that this little AS350 has. How about a Bell 204, 206, 209, 212, 222, 230, Airwolf, AH1 Cobra etc.
Pros & Cons:
- Looks great. Amazing scale details abound. Easy to see.
- Great value for both helicopter and parts.
- Uses Futaba's S-FHSS spread spectrum protocol (FTR Futaba Transmitter Ready).
- RTF version comes with a decent computerized radio.
- BNF version came with near perfect mechanical setup.
- Uses rotary servos.
- Powerful and efficient brushless main motor.
- Uses separate brushless ESC.
- Flies well for a collective pitch micro heli.
- Two levels of remotely selectable stabilization (3D/6G).
- XK's typical good quality and overall design.
- Nice assortment of spares included.
- Two port charger included.
- XK is carried at many hobby shops so parts support is very good.
- Power sucking, weight increasing, torque inducing tri-blade head.
- Scale detail is fragile.
- Heavy & under-powered for aerobatic flight.
- Coreless tail motor can't keep up to torque spikes at times.
- Exaggerated right lean from left TRTT causing imbalance between left and right banking coordinated turns.
- Short flight times - even for a micro, even when flown gently.
- Lacks scale lighting which would add even more appeal.
XK K123 Specifications:
- Heli Class: Electric 120 size scale micro collective pitch RTF & BNF versions
- Skill Level: Collective pitch beginner or intermediate
- Recommended Flying Style: Scale
- Recommended Flying Environment: Large indoor space or outdoors
- Heli Height: 77mm
- Heli Length: 238mm
- Main Rotor diameter: 244mm
- Tail Rotor Diameter: 55.5mm
- Main Rotor Blade Length: 120mm (center of bolt hole to tip)
- Flying weight: 81g
- Flying time: 4:30 tame, 2:00 hard
- Main Motor: 1106 11000kV Brushless
- Tail Motor: 8502 Coreless
- Cyclic/Collective Servos: Micro Rotary x3
- Tail Servo: None - Fixed pitch, direct drive tail
- LiPo Battery: 1S 3.7V 500 mAh
- Battery Size: 34mm x 25mm x 8mm
- Radio: S-FHSS Compatible 6CH 2.4GHz computerized (included with RTF version) Will bind to 6 channel or higher Futaba S-FHSS or OpenTX multi-protocol radio with S-FHSS protocol (FTR)
XK K123 Ordering Information
Banggood
- XK K123 RTF or BNF Kit with 4 LiPo packs
- XK K123 spare tail motor
- XK K123 spare servo gear set
- XK K123 spare parts


Need Heli Help?
- Getting into the hobby but have no one to help you?
- Are you feeling overwhelmed & confused?
- Are you tired of wasting time seeking partial and conflicting information?
- Don't understand the maze of RC heli setup fundamentals?
- Is that sickening feeling after crashing turning you off the hobby?
- Are you simply ready to give up?
My RC Helicopter eBooks will help you with those exact problems. Grab your copies today.

Click Here For More Information

Click Here For More Information

Click Here For More Information
Recent Articles
-
The Ultimate RC Helicopter Tools Guide: What You Need & Why
Apr 10, 26 12:56 PM
 A complete breakdown of RC helicopter tools. Let's cover swashplate levelers, pitch gauges, hex drivers and much more to help you achieve a pro-level build.
 -
Best RC Battery Charger Guide: How to Choose the Right One
Apr 07, 26 02:29 PM
 Confused by Amps and Watts? Learn how to choose the best RC battery charger with this guide covering features, power, ratings, safety and much more.
 -
RC Power Supply Guide: Don't Starve Your RC Charger
Mar 31, 26 06:33 PM
 From low cost converted server power supplies to commercial grade options, let's find the best RC power supply for your specific RC battery charger.
