Blade Trio 360 CFX Review
submitted by Ruedi Benning

1) Introduction – why the Blade Trio 360 CFX?
So why is it that I decided to purchase this bird? Some readers may remember that I had bought the Blade 300CFX a while ago (review available here), since I wanted to get back into the smaller size helicopters again (my other helis are of the 550 or 700 size).
Unfortunately the 300CFX turned out to be too aggressive and too agile for my personal taste due to the high head-speed that was dictated by the overly high disk-load of that little helicopter – so in the end, I sold the 300CFX since I almost never flew it.
Anyway, I still had the wish to operate a smaller alternative to my big birds, something that would be of smaller size, yet allow for relatively low head-speeds while still offering sufficient stability, something that could be sitting in the boot of my car to be taken out for a flight on the field after work.
After Horizon Hobby announced the 3-blade upgrade kit to the 360CFX (and later on the TRIO 360) I was intrigued to get it right away, yet shied away from the cost at that point in time – however a couple of months ago I found a real good bargain and just couldn’t resist any longer.
My idea about the 3-blade layout was that it should allow for lower rpm than a 2-blade pendent. I had seen several reviews and also a YouTube video which showed that the 360 can easily be flown with a 3S battery set-up (6S is standard) and this finally got me into it.
For my Blade Trio 360 CFX, I decided for a 4S battery setup. I figured that this would give me the balance between power and smoothness I was looking for.
2) Blade Trio 360 CFX Unboxing

Like the other Horizon Hobby products I've had over the years, the Blade Trio 360 CFX came perfectly packed. Nothing to complain about so far.
 Blade Trio 360 CFX BNF Basic
 The Trio 360 CFX, like most of
Blade's "advanced" helicopters is only available in a BNF (Bind &
Fly) Basic version, so you need a computerized Spektrum, JR, clone (DSM2/X) radio to operate it. I fly with a Spektrum DX9 and the binding process was simple.
The "basic" indicates no LiPo battery is included which as I already mentioned gives voltage options should some of us chose not to fly with the more costly & performance minded 6S packs.
 Close-up of the Trio's Tri Blade Head
The 3 blades were not mounted to the blade-grips but were loosely attached together with the bolts, nuts and washers.

The blades are of 360mm length (a bit over 14”). Total rotor diameter is at 790mm (31.1”)
Like for all newer Horizon Hobby helicopters, the blade size has become part of the product name. So despite the fact that Blade Trio 360 CFX is less than 450 in pure numbers, this helicopter is still significantly bigger than for example a Blade 450X or most other helicopters of the 450 size.
I must say that I do appreciate the fact that the nomenclature rules are now like this, making it much easier to compare heli-sizes than before when a theoretical motor class had been the name giving component for smaller birds.
The blade grip washers are made of
plastic and are of a special shape with a “bulge” in the middle. This
bulge is meant to easily slip into the groove that can be found on the
inside of the blade grips. The advantage is that the washers cannot slip
away to the sides anymore when mounting the blades. A smart solution
and the first delighter I found on my new bird.
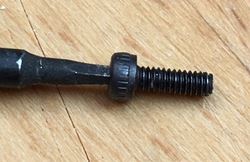
 Trio's Blade Bolts, Lock Nuts, & Compression Washers
What
also caught my attention were the clear marks of usage on the bolts. I
was trying to convince myself that this is due to the fact that the
helicopter had been test flown thoroughly before the blades and bolts
got taken off again. Else I would have to ask myself if cost cutting
had reached a new dimension at Horizon Hobby forcing them to sell old and
used bolts.
Overall a pretty good first impression of the TRIO 360 CFX... So far, so good.
3) Blade Trio 360 CFX Initial Inspection & Findings
When putting on the reading glasses (I’m over 50) and taking a closer look, I found the following:
- All in all it seems solidly built. Nicely cut carbon plates and CNC aluminum parts. The canopy is made from fiberglass, which boasts a top quality high visibility paint scheme.
- The main gear is skewed (slant tooth) which in this class seems to have become the standard, being both quieter in operation and less likely to strip out.

- Servo cable mounting has to be
called “adventurous” at best (avoiding the term “criminal”). For
example the tail-servo cable loops into the frame from behind (in order
to prevent it from wobbling around somewhere else I guess). Unfortunately this loop is so close to the main gear that it would
almost certainly get damaged during flight.
 OUCH!
OUCH!- Other servo cables were zip-tied firmly to the right main frame pressing them directly onto the sharp edge of the carbon plate. Not something I would let slide in a build.

- Like
in other newer Blade helicopters, the battery mounting plate is
carrying a nice blade logo. Too bad that this is exactly the position
where I have to put velcro on in order to fasten the battery.

- Having
read reports about the 360 on helifreak.com, I gave some attention to
the pinion gear-mesh. A substantial number of 360s had stripped their
main gear on maiden flight due to loose gear-mesh. As a matter of fact
also in my case the gear-mesh seemed a little loose for my taste.

- When looking at the main rotor head it shows that the head I received does in no way match with the drawing from the manual. I suspect that the head I received is the one from the upgrade kit, but I had no way to prove it nor did I care too much about it as long as it performs (and it does).

- The Blade Trio 360 CFX comes
with the new Spektrum AR7210BX FBL unit. This one is the direct successor of the
well-known AR7200BX allowing for more setup options and also providing
rpm-governing and rescue functionality (if you purchase the license
which I didn’t) – my unit came with all 3 dials in the middle position.

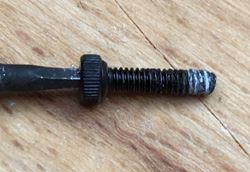
- Checking
thread-locker on the screws showed that about 1/3 of them had never
seen any Locktite. The very first one I unscrewed from the frame locked
like this:
And even though it seems to be standard for Blade Helis to save on the thread-locker, it still is not only avoidable but also pathetic.
I do however admit that screws in essential positions (such as rotor head or motor mounting) were all well secured.
When looking at the swashplate I found that they had used a massive amount of grease for the bearing that I simply wiped off.
 Blade Trio 360 CFX Excess Swashplate Grease
As you can see both above and below, the inner ring of the swashplate bears 4 linkage balls. 3 of them of course are for the 3 blade grips, spaced 120 degrees apart. The other ball is positioned between two of the 120 ones for the single washout-arm, which is integrated onto the bottom of the rotor head.
Both the washout swash ball and washout arm are already positioned to obtain the correct gyroscopic precession phase angle. No multi-blade phasing required which is certainly a time saver.
 Blade Trio 360 CFX Single Integrated Washout Arm
4) Trio 360 First Modifications
The three blades were differing significantly in weight. During static balancing I had to put 6 strips of adhesive to one of the blades in order for it to be balanced with the heaviest. The second blade needed 4 strips.

For simplicity reasons I did not dynamically balance the whole
rotor system on my DuBro balancer since this would have required taking
the rotor apart.
Before
making any further modifications I first of all used a 3S Battery with
the EC3 connector to bind the heli to my DX9. It turned out that the
stock ESC (Castle Talon 35A) would not allow for any changes in head
speed driven by alternate throttle curves on my TX. I guess this is due
to the governor function provided by the new RX.

Since I had no clue how to change the programming and since I generally gave up contacting HH-support in Europe a long time ago I simply exchanged the ESC with one from Robbe that was sitting in my spare-part box.
I combined this one with a TXE telemetry unit for my IISI telemetry system and attached an XT60 connector.
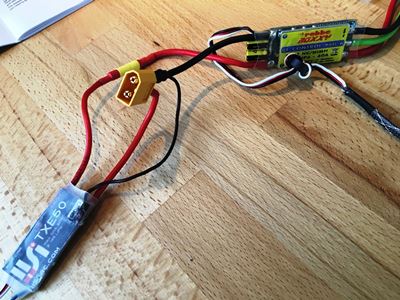
I chose the XT60 since my favorite battery brand (SLS) offers 4S batteries that already come with XT60s on it.
I
initially attached the telemetry unit to the right side of the frame
and led the antenna to the back. When mounting the battery it turned out
that all the “cable-salad” I had produced at the nose of the frame
caused the canopy to not slide into proper position anymore. Instead of
changing the “salad-recipe” I decided to drill new grommet-holes
slightly further to the back, allowing for more space under the canopy.

I then put all the loose servo cables (including the loop from under the main gear) into one of those “self-furling fabric hoses” (does this translate well?) and zip-tied it to the frame. This should fix the damage risk.

As a final step I slightly adjusted the gear mesh.
5) BeastX Flybarless Setup
When going through the BeastX setup-menu I found the following:
- Normal standard settings (such as servo-frequency, sensor- and servo-directions,…) where all in good shape.
- Tail rotor endpoints I always adjust myself – I have no clue if they were OK, but let’s assume they were.
- Servo arm centering seemed OK as well.
- What had not been set up correctly at all was the zero-pitch-setting as well as the maximum pitch range. Max collective pitch range had been set to -10° up to +14.5°. I changed that to a perfect symmetrical collective range of +/- 12° like on all of my helicopters.
- Zero-pitch setting required me to take the head off and start from scratch with a complete head setup (servo-arm-centering, swashplate centering and levelling, zero-pitch setup) it had been completely wrong out of the box.
- My new heli was a bit nose heavy which I did not consider too much of a problem initially.
6) Blade Trio 360 CFX First Flights
For my Blade Trio 360 CFX I have chosen to use SLS XTRON 2200mAh 4S 30C/60C batteries.
With this battery type and with the additional electronic components, the total take-off mass sums up to 990g (35oz) which is quite a bit above the stock TOM of 850g (30oz). With 260g, my SLS battery contributes more than a quarter to this. (Stock battery = 220g)
Throttle-curves where set to 40%flat / 60%flat / 80% flat in the three flight-modes. I set the pitch curves in all flight modes for a full aerobatic collective range (0-25-50-75-100). I set all dual rates were set to 100% and all Expo to 0%. With these settings I spooled it up for the first time.
Here is a little video compilation of the first 3 flights I
did.
It turned out that the Trio 360 CFX does have enough “oomph” even at 40% throttle. I don’t exactly know what the head-speed is since I did not attach an rpm sensor to my telemetry, but 40% throttle should equal about 1/3 of the designed maximum head speed in a 6S configuration (@ 80% throttle).
With 80% throttle it flies very agile, already a bit too agile for my taste, so I found that 60% throttle actually gives me the head speed I like.
I am not a 3D-pro by any means – instead I prefer some easy aerobatics (loops, turns, flips,…) and inverted flying. The mixed head-speeds I used on the first few flights gave me an average of 9 minutes of air-time before my telemetry told me that the battery is approaching the 20% capacity level (80% discharged).
Given that, and when looking at it’s weight, I might have overdone it on the battery size. Actually 2000mAh or even 1800mAh batteries should work nicely on this helicopter while decreasing disk-load making it even better to fly – I might try this in due course.
Blade-tracking was out of sync, but since I had changed the entire mechanical setup, I guess I cannot blame HH for this one.
Unfortunately the Blade Trio 360 CFX gave me almost the exact same first flight impression like the 300CFX 3 years ago – it flew very unstable, always tilting to one side and hard to keep in control, especially in inverted positions. I used almost 2 full batteries worth of flight-time to try and trim it using parameter menu A yet with limited success.
I had to put in a lot of time and effort to get the trimming and gain-settings (dial 1 and 2) to a point where I can now say that it flies as I want it.
What also quickly became obvious is the fact that reducing head speed as significantly as I did, comes with a price. At 40% throttle it seems impossible to find the right tail gyro-setting. No matter how I set it, the tail would either blow out at high torque or it would oscillate.
I tried everything on the mechanical side to improve that; including polishing the tail rotor shaft and so on, but I could not improve response. However since 60% throttle seems to be the right setting for me anyway, I did not care so much about it. At 60% throttle, the tail will hold nicely for the vast majority of the maneuvers I fly; however if you push it, the tail will slightly blow to the right by about 15-20 degree, yet without blowing out completely.
Therefore, if I choose a more torque-demanding style (like when I fly backward inverted or when doing rainbows) I simply switch to 80% which fixes this “problem”. Nevertheless, in the 4S configuration the Blade Trio 360 CFX is of course not a brutal 3D-machine any more, but that had not been my aim anyway.
7) Additional Blade Trio 360 CFX Modifications
In order to get the CG right, I decided to change location for some of the electronic components. The biggest change was to move the TXE telemetry unit as far to the back as possible.
It's now positioned on the left side of the frame below the main gear. I also used more of this fabric hose to protect the cables.

This way also the right hand side looks much cleaner and CG is now dead on.

As for the radio-settings I decided to add some expo to the cyclic controls as well as to yaw since I found it to be overly sensitive around mid-stick in certain situations. My 3 optional settings are now:
Mode 1: cyclic D/R=100% / EXPO=30% - yaw D/R=80% / EXPO=40%
Mode 2: cyclic D/R=100% / EXPO=20% - yaw D/R=85% EXPO=30%
Mode 3: cyclic D/R=100% / EXPO=0% - yaw D/R=90% EXPO=20%
Most of the time I fly with setting 2 since this best mimics the “touch and feel” that my LOGO 690 provides. I will however continue to experiment with the yaw setting which is not yet to my full satisfaction.
8) Trio 360 CFX Résumé
After 20 flights with a total air-time of almost 3 hours I can summarize my impressions as follows:
Now that I have my Blade Trio 360 CFX set up the way I want, it really flies great. My target to operate a smaller helicopter that allows for lower head-speeds while still being agile and stable enough for my flying style was accomplished. Of course I had wished to get the rpm down even further, but I am happy with what I have achieved.
Its stability still slightly lags behind the one that is provided by my KDS 550 or by my Mikado LOGO 690 but given the smaller overall size (and mass) of the Blade Trio 360 CFX, this is of course not a surprise. I simply have to get used to flying smaller helicopters again and I guess my expectations to have a 360-sized bird operated at low head-speed, yet allowing for the exact same stability like a 700-sized bird was simply unrealistic.
What some readers might be interested in is to know if I would recommend this helicopter (in 4S configuration) as the first CP-Helicopter for beginners or intermediate pilots.
I’d like to say that if the Trio 360 is set up correctly, and if the pilot does have basic flying skills on either a fixed pitch (e.g. Blade 120 or Blade 200) or on a quad-copter (like the Blade QX series) set to agility mode, the Trio can serve as the perfect first CP-heli. The long flying time of up to 10 minutes as well as the tamed cyclic response due to the lower rpm is ideal for the learner.
On top, it’s high visibility paint scheme canopy as well as it’s larger size and mass clearly gives it advantages over the old Blade 300X (which I have learned controlling a CP on) or over a 450 size helicopter.
Unfortunately the relatively high price over a cheap 450 as well as the lousy setup out of the box speaks against a clear recommendation. If you fly in a club with experienced pilots among your buddies who can help you get the setup right, then yes, I would recommend this helicopter for the learner. I do however suspect that Horizon Hobby has decided to discontinue the two blade 360 CFX, so sooner or later it might become impossible to purchase a new one anyway.
I did not (yet) try it with a 6S setup so I am unable to judge it’s full 3D-capability yet, since my own personal 3D-capability is very limited, I am not sure if I will ever give it a shot.
I hope my little report on the Blade Trio 360 CFX has been enjoyable and insightful for you.
cheers,
Ruedi


Can't get setup help locally? These two eBooks may help you out. Click on images to find out what material is covered.
Trio 360 Specifications & Owners Manual
- Heli Type: Collective Pitch, Electric, Class Size 360/450
- Completion Level: Bind-N-Fly Basic
- Suggested Battery: LiPo 6S (22.2V) 1300mAh, EC3 connector
- Channels: 6 (Throttle, Collective, Pitch, Roll, Yaw, Gain)
- Main Motor Type: Brushless Outrunner 1800Kv
- ESC: Castle Creations Talon 35Amp, 25V, 7A BEC
- Flying Weight: 30 oz (875 g)
- Height: 8.46 in (215mm)
- Length: 26.38 in (670mm)
- Width: 4.33 in (110mm)
- Main Blade Material: Carbon
- Main Frame Material: Carbon
- Main Rotor Blade Length: 14.17 in (360mm)
- Main Rotor Diameter: 31.10 in (790mm)
- Main Rotor Head Type: Collective Pitch Tri-Blade, Integrated Washout (non-DFC)
- Swashplate Type: 120 deg
- Cyclic Servos: Spektrum Sub-Micro Digital H3050 (x3)
- Stabilization/RX: Flybarless (Spektrum AR7210BX)
- Tail Drive Method: Belt
- Tail Servo: Spektrum Sub-Micro Digital H3060 (x1)
- Tail Blade Material: Plastic
- Tail Rotor Blade Length: 2.56 in (65mm)
- Tail Rotor Diameter: 6.89 in (175mm)
Blade Trio 360 CFX Owners Manual
Do you
have an RC helicopter review you would like to share on RC Helicopter
Fun.com for others to benefit from like Ruedi has done here? If so, please contact me.

As an Amazon Associate I earn from qualifying purchases.

Need Heli Help?
- Are you getting into the hobby and have no one to help you out?
- Are you feeling overwhelmed & confused?
- Are you tired of wasting time seeking partial and conflicting information?
- Is crashing due to not fully understanding helicopter setup turning you off the hobby?
- Are you simply ready to give up?
My RC Helicopter eBooks are here to help you with those exact problems.
Click Here For More Information

Click Here For More Information
Click Here For More Information
 Interested In RC Airplanes Too? Save Money With The Beginner's Combo Package
Recent Articles
-
OMPHobby RC Helicopters Let You Master The Skies
Apr 18, 24 07:21 PM
 Don't settle for anything less! OMPHobby RC Helicopters are built to last while taking your flying passion to a whole new level.
 -
Best Flybarless System In 2024 - Is There Such a Thing?
Apr 02, 24 09:08 PM
 Looking for the best flybarless system? Let's look at what's out there, pros & cons, features and pricing, to help you narrow your list.
 -
Learn How To Fly 3D Helicopter Aerobatics
Mar 15, 24 03:30 PM
 Want to learn how to fly 3D helicopter aerobatic maneuvers? Follow this skill building lesson plan to succeed.